Table of Contents
In this post, we’ll learn how to manage and scale your App Engine resources on the Google Cloud platform, which would include:
- The different types of scaling types (Basic, Manual, and Automatic), and when to use them.
- How to manage instance classes to increase the memory and CPU available to each instance.
When and why should you scale?
Every time we deploy our app on App Engine, it assigns a certain number of machines to handle all of the incoming requests.
As more user start using our app, the load on each App Engine instance increases. If left unchecked, this can lead to an increased response time and error rate — which spells bad news for our users.
Scaling our application can help improve our user experience by matching the incoming traffic with the provisioned hardware capability.
Viewing the current number of instances
You can view the current number of assigned instances on the App Engine versions dashboard
This shows the number of instances assigned to each app version that traffic is being routed to:

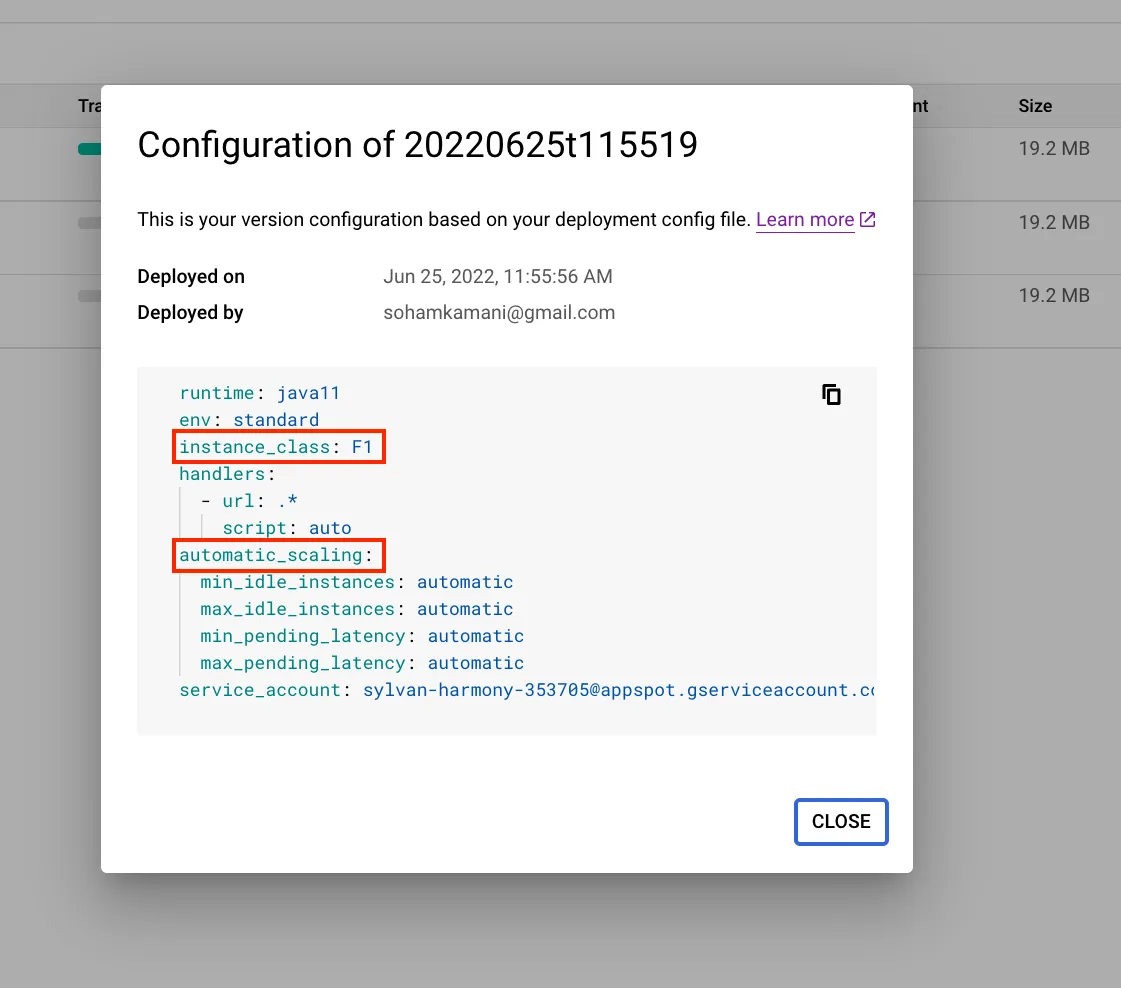
We can view the configuration file for more details on the instance class and scaling type:

Let’s look at these in more detail.
Instance Class
App Engine provides different instance classes to run your application.
Each instance type comes with its own memory and CPU constraints. Selecting a larger instance type also leads to an increase in cost, so we should monitor our applications requirements and select an instance type accordingly.
Your scaling type will also determine your instance type (for example, automatic scaling is only supported for F instance types)
Scaling Type
The scaling type determines how the number of instances are provisioned relative to the incoming traffic to your application.
Manual Scaling
With manual scaling, the total number of instances are fixed — irrespective of the incoming traffic volume.
Manual scaling is best suited for applications that are small-scale and where the amount of traffic being received is predictable.
If we want to accommodate a higher traffic volume, we need to change the configuration and increase the number of instances ourselves.
Basic Scaling
Basic scaling provisions a new instance every time we receive a new incoming request and there are no existing instances available to handle it.
If an instance is idle for a certain amount of time, it is then de-provisioned.
This means that as your request volume increases, the number of instances will increase as well.
We can configure basic scaling by specifying its parameters, namely:
- Maximum instances - The upper limit on the number of instances that can be provisioned. This should be set to limit unforeseen costs in case of a large spike in traffic volume.
- Idle timeout - The time after which the instance will shut down if it hasn’t received any requests.
Automatic Scaling
Automatic scaling gives us a smarter way to configure how our instances scale, compared to the basic scaling option.
Instead of provisioning a new instance for every pending requests, we can specify the performance requirements that we’re looking for, and App Engine will adjust the number of instances to meet them:
- Latency - The amount of time that a request waits for before being served by an instance. We can provision and de-provision instances if the actual latency crosses a minimum or maximum threshold.
- CPU utilization - We can specify the CPU usage threshold as a percentage, beyond which new instances will be provisioned to handle incoming requests.
Configuring scaling settings on app.yaml
In this section, we’ll see how to configure the instance class and scaling type in your app.yaml file.
If your App Engine project directory contains an app.yaml file, GCP will use it to configure your App Engine application settings. Every option configured here has a default, so even if you don’t have app.yaml set, App Engine will choose a set of default options.
You can see the sample configuration on Github to see how the
app.yamlfile is located relative to the rest of our codebase.
To get your current configuration, we can go to the configuration view on the versions page as seen in the previous section:

You can copy these contents and paste them into a new app.yaml file in the root directory of your project.
By default, we have automatic_scaling as our scaling type, and F1 as our instance type.
runtime: java11
env: standard
instance_class: F1
handlers:
  - url: .*
    script: auto
automatic_scaling:
  min_idle_instances: automatic
  max_idle_instances: automatic
  min_pending_latency: automatic
  max_pending_latency: automatic
service_account: [email protected]
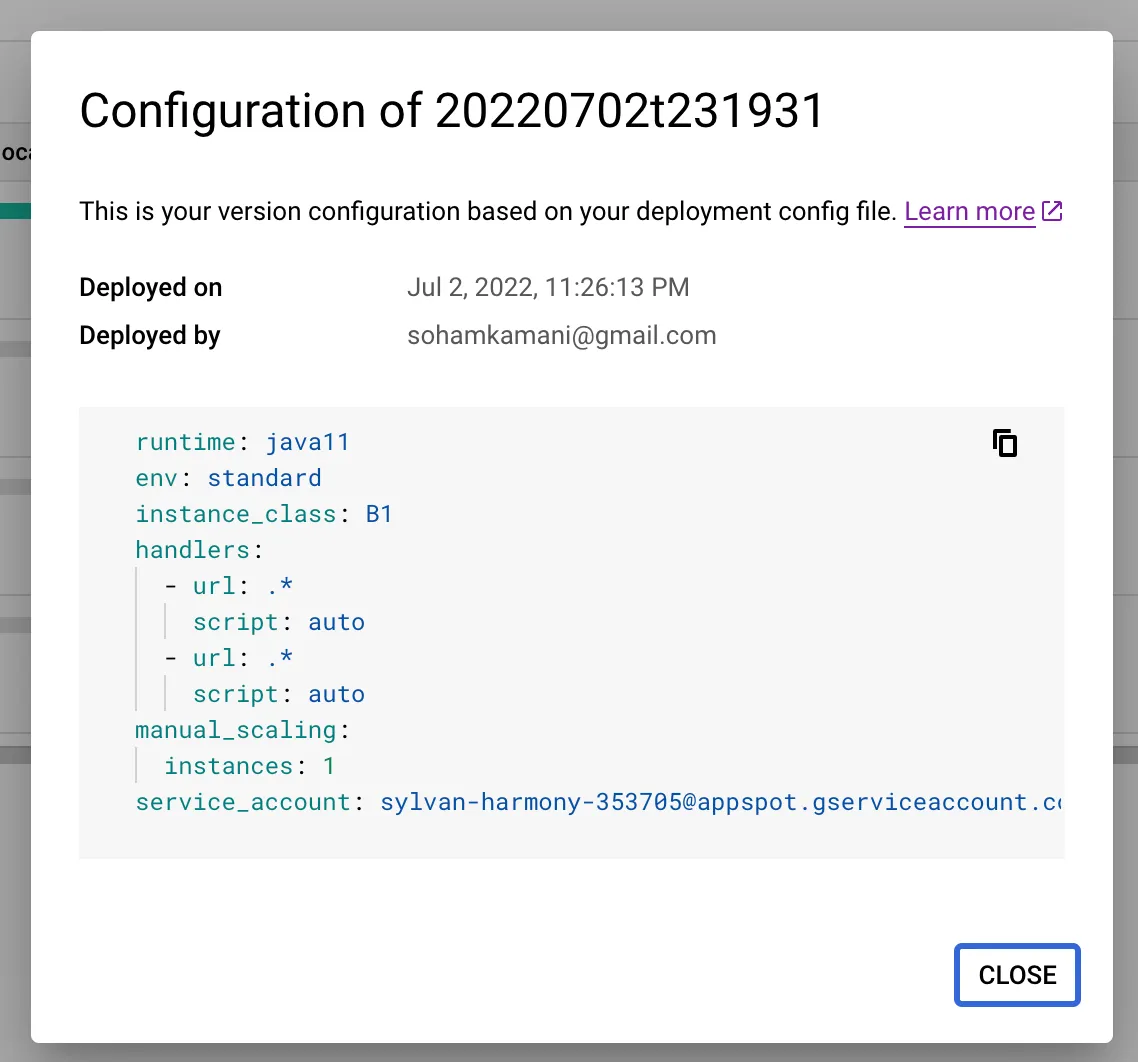
We can change the scaling type and instance class based on our requirements. Let’s take a look at a sample configuration for manual scaling:
runtime: java11
env: standard
# remember to use an instance class compatible with your scaling type
instance_class: B1
handlers:
  - url: .*
    script: auto
manual_scaling:
  instances: 1
service_account: [email protected]
Once you deploy your application, you can view the configuration again to verify the scaling type and instance class:

Similarly, we can change the configuration to use basic scaling:
runtime: java11
env: standard
instance_class: B1
handlers:
  - url: .*
    script: auto
basic_scaling:
  max_instances: 3
  idle_timeout: 10m
service_account: [email protected]
You can view the documentation page to see more details about all the configuration parameters available.
Conclusion
GCP’s App Engine gives us a variety of configuration options for scaling your application. Some things we should consider when deciding which option to use are:
- The scale and criticality of the application - how important is it that requests are served as soon as possible, and with minimal latency?
- Cost - provisioning more resources isn’t free. There will always be a tradeoff between performance and cost, and we need to decide an appropriate balance for our use case.
We can monitor our application to get a better sense of these requirements, and configure our application accordingly.
For more information about App Engine and its features, you can see the official documentation page.