Table of Contents
This tutorial will explain how to run a RESTful HTTP server using the Spring Boot framework.
We will learn how to build a HTTP server from scratch and create RESTful endpoints for making GET and POST requests.
Next, we’ll learn how to work with different parts of the request and response, like JSON serialization, headers and HTTP status codes.
By the end of this post you should have a good understanding of how to create and run your own RESTful web application.
If you just want to see the code, you can view the working example on Github.
Initializing a New Project Folder
You can use Spring Initalizr to setup and download your project.
For this tutorial, we’re going to use a maven project with the Spring Web dependency:
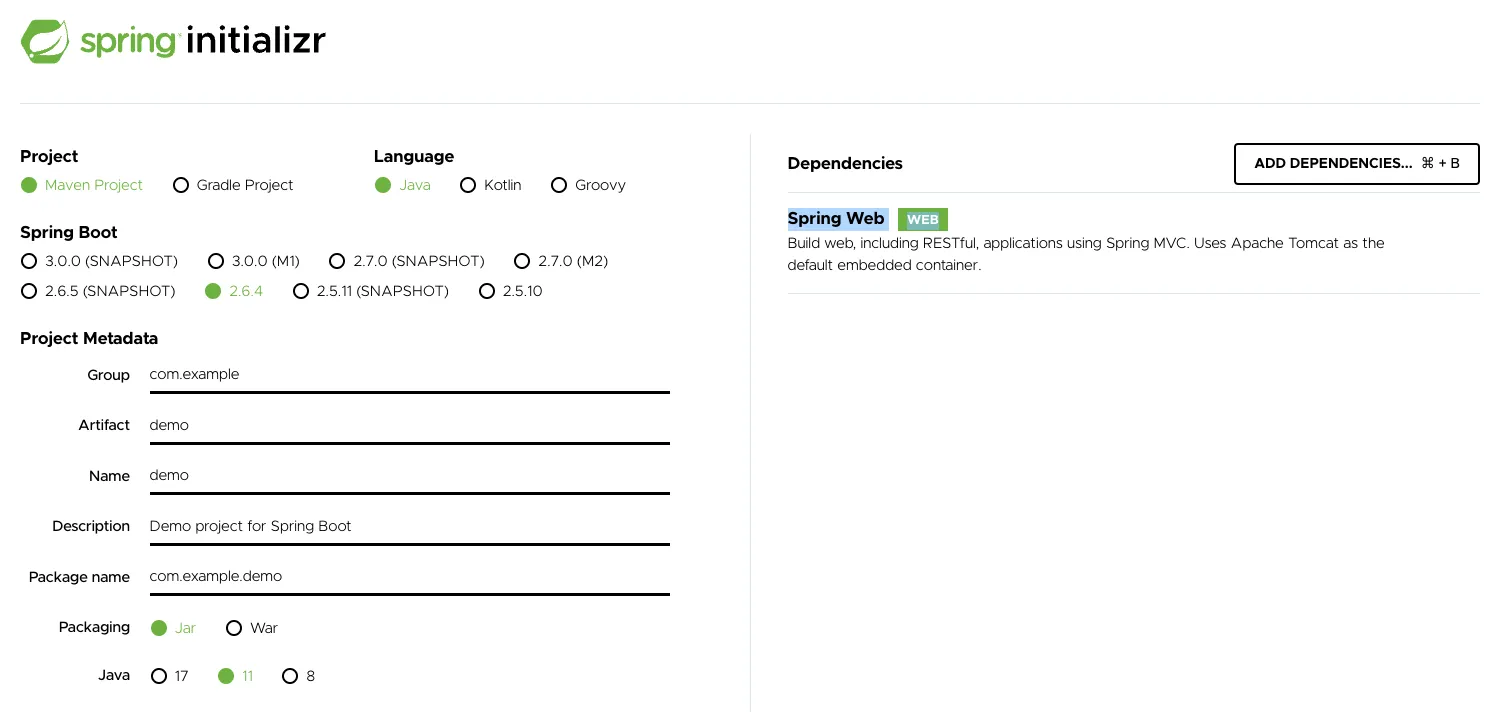
You can download a zip file containing the project folder structure, which should look like this:
├── HELP.md
├── mvnw
├── mvnw.cmd
├── pom.xml
└── src
    ├── main
    │   ├── java
    │   │   └── com
    │   │       └── example
    │   │           └── demo
    │   │               └── DemoApplication.java
    │   └── resources
    │       ├── application.properties
    │       ├── static
    │       └── templates
    └── test
        └── java
            └── com
                └── example
                    └── demo
                        └── DemoApplicationTests.java
We can start developing our new Spring Boot application from here.
Creating a Simple GET Handler
Let’s create our first route in the DemoApplication.java file:
// This annotation instructs Spring to initialize its configuration - which is needed to start a
// new application
@SpringBootApplication
// Indicates that this class contains RESTful methods to handle incoming HTTP requests
@RestController
public class DemoApplication {

	// We can start our application by calling the run method with the primary class
	public static void main(String[] args) {
		SpringApplication.run(DemoApplication.class, args);
	}

	// The `GetMapping` annotation indicates that this method should be called
	// when handling GET requests to the "/simple-request" endpoint
	@GetMapping("/simple-request")
	public String simpleRequest() {
		// In this case, we return the plain text response "ok"
		return "ok";
	}
}
Spring uses annotations to map HTTP routes to methods defined in our class. In this case, a request sent to the GET /simple-request endpoint is mapped to the DemoApplication.simpleRequest method.
You can see the full list of annotations on the documentation page
Spring also uses reflection to determine the return type of the method, and maps it to the HTTP response body. In this example, we’ve returned a String type from simpleRequest, so our HTTP response body will be plaintext.

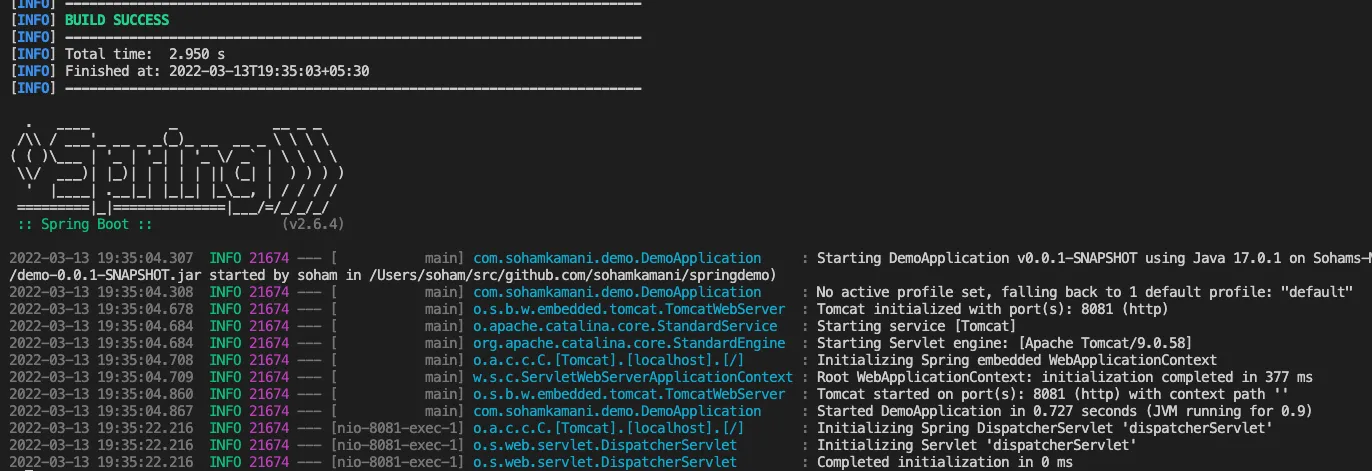
Let’s run our application and see this in action.
To run the application, you can execute the below command on your terminal:
mvn clean compile package && java -jar ./target/demo-0.0.1-SNAPSHOT.jarThis should compile your code, package it into a JAR file and run your application. If you run this on your terminal successfully, you should see the server startup message:
You can test the API by sending a GET request to the endpoint:
GET http://localhost:8081/simple-requestWhich should give you this response:
HTTP/1.1 200
Content-Type: text/plain;charset=UTF-8
Content-Length: 2

ok
You can use a client like cURL or Postman to create and send HTTP requests
Request Params
Let’s see how we can extract request url params in our application.
For this example, consider a request to GET http://localhost:8081/echo?text=hello. Here, we have a request param with the name text and the value hello.
Spring boot uses annotations to inject parameters as method arguments. To get request params, we can use the @RequestParam annotation:
@SpringBootApplication
@RestController
public class DemoApplication {
	// ...
	// ...

	@GetMapping("/echo")
	// We can pass the name of the url param we want as an argument to the RequestParam annotation.
	// The value will be stored in the annotated variable
	public String echo(@RequestParam(name = "text") String echoText) {
		// The response will be "Echo: " followed by the param that was passed in
		return "Echo: " + echoText;
	}
}
Now, if we make a request to:
GET http://localhost:8081/echo?text=helloWe will get the response:
HTTP/1.1 200
Content-Type: text/plain;charset=UTF-8
Content-Length: 11

Echo: hello
Path Variables
Path variables are similar to request params, except they are a part of the URL path itself. So, if we send a request to GET http://localhost:8081/echo/hello, we want hello (an other text in its place) to be represented as a variable.
We can use the @PathVariable annotation to extract this text:
@SpringBootApplication
@RestController
public class DemoApplication {
	// ...
	// ...

	// We can add a variable to the path by wrapping its name in curly braces
	@GetMapping("/echo/{text}")
	// The PathVariable annotation assigns the text form the actual request to the `echoText`
	// argument
	public String echoPath(@PathVariable(name = "text") String echoText) {
		return "Echo in path: " + echoText;
	}
}
Now, if we make a request to:
GET http://localhost:8081/echo/helloWe will get the response:
HTTP/1.1 200
Content-Type: text/plain;charset=UTF-8
Content-Length: 19
Date: Mon, 14 Mar 2022 14:24:11 GMT
Connection: close

Echo in path: hello
Sending JSON Responses
Until now, we’ve only been sending plain text responses. Let’s see how we can send a JSON response body in our handlers.
The Spring framework makes this really easy for us - instead of returning a String from the handler, we can return any Java object instead, and it will be encoded to JSON by default.
Let’s look at an example, where we return information about our coffee order. First, we need to create a Coffee class:
public class Coffee {
    String size;
    boolean milk;

    // In order for Spring to serialize Coffee objects, we need
    // to define getter and setter methods for each attribute
    public String getSize() {
        return this.size;
    }

    public void setSize(String size) {
        this.size = size;
    }

    public boolean getMilk() {
        return this.milk;
    }

    public void setMilk(boolean milk) {
        this.milk = milk;
    }

    // we will use the toString method in later examples
    public String toString() {
        return "[" + size + "," + Boolean.toString(milk) + "]";
    }
}
Now we can create a handler that returns this object as a JSON payload:
@SpringBootApplication
@RestController
public class DemoApplication {
	// ...
	// ...

	@GetMapping("/large-cappuccino")
	public Coffee largeCappuccino() {
		// create a new Coffee object and set its attributes
		Coffee largeCappuccino = new Coffee();
		largeCappuccino.setMilk(true);
		largeCappuccino.setSize("L");
		// the returned object will be encoded to JSON by the Spring framework
		return largeCappuccino;
	}
}
Spring uses Jackson as the default library to encode and decode JSON payloads. This means that encoding rules like attribute names, empty value omission, and spacing are based on its implementation.

If we run our server and call the API, we can see the JSON encoded response body:
GET http://localhost:8081/large-cappuccinoHTTP/1.1 200
Content-Type: application/json
{
"size": "L",
"milk": true
}Note that the content type header has now changed to
application/json
Reading JSON Request Body
To read a JSON body, we can use the @RequestBody annotation, along with the class object that we want to decode it into.
Similar to the previous example, the decoding and object creating is handled by the Spring framework:
@SpringBootApplication
@RestController
public class DemoApplication {
	// ...
	// ...

	// We can use @PostMapping to denote that this handled a POST request
	// to the /coffee endpoint
	@PostMapping("/coffee")
	// We need to specify the @RequestBody annotation along with the `Coffee`
	// class as the argument. The decoded JSON body is then stored in the `coffee` argument
	// variable
	public String createCoffee(@RequestBody Coffee coffee) {
		// We can return a plaintext response with the string representation of the coffee
		// argument
		return "Created coffee: " + coffee.toString();
	}
}
For now, we are just returning a plaintext response. In an actual application, we would store this data in a database or file storage.
Now we can send a JSON payload as the request body:
POST http://localhost:8081/coffee
Content-Type: application/json

{
    "size": "M",
    "milk": false
}
And the handler will parse the request and send us the plaintext response:
HTTP/1.1 200
Content-Type: text/plain;charset=UTF-8
Content-Length: 25

Created coffee: [M,false]
Reading Request Headers
In this section, we’ll create a GET /echo/headers endpoint that will read all the request headers and print them out to the response.
To read headers, we can use the @RequestHeader annotation. This will expose the headers in the form of a Map that we can use within our handler:
@SpringBootApplication
@RestController
public class DemoApplication {
	// ...
	// ...

	@GetMapping("/echo/headers")
	public String echoHeaders(@RequestHeader Map<String, String> headers) {
		// Create a new StringBuilder to print the list of headers
		StringBuilder sb = new StringBuilder("Headers: \n");
		// loop through each header key-value pair
		for (Entry<String, String> header : headers.entrySet()) {
			// Add the header to the string in "key:value" format
			sb.append(header.getKey());
			sb.append(":");
			sb.append(header.getValue());
			sb.append("\n");
		}
		// return the completed string
		return sb.toString();
	}
}
Now if we make a request to:
GET http://localhost:8081/echo/headersWe would get the list of request headers as the response:
HTTP/1.1 200
Content-Type: text/plain;charset=UTF-8
Content-Length: 106

Headers:
user-agent:vscode-restclient
accept-encoding:gzip, deflate
host:localhost:8081
connection:close
Setting Response Headers
Spring gives us a convenient way to set response headers as well. We can inject an HttpServletResponse class as an argument into our handler and use its setHeader method to set a response header.
Similar to how we use annotations, the Spring framework recognizes the javax.servlet.http.HttpServletResponse class and allows us to use it as an argument:
//...
import javax.servlet.http.HttpServletResponse;
//...

@SpringBootApplication
@RestController
public class DemoApplication {
	// ...
	// ...
	@GetMapping("/custom-header")
	// the HttpServletResponse argument is injected by the Spring framework
	public String setCustomHeader(HttpServletResponse response) {
		response.setHeader("X-Custom-Header", "Some-Custom-Value");
		return "ok";
	}
}
Now, if we make a request to:
GET http://localhost:8081/custom-headerWe can see the response with the X-Custom-Header header set to our custom value:
HTTP/1.1 200
X-Custom-Header: Some-Custom-Value
Content-Type: text/plain;charset=UTF-8
Content-Length: 2

ok
A Note On
HttpServletResponse
TheHttpServletResponseis actually part of the javax.servlet.http package, and contains low level methods to read and modify properties of the HTTP request like cookies, headers, and I/O streams.
One thing I like about Spring is that it gives us useful abstractions through its annotations, but still gives us control over fundamental aspects of the HTTP request and response lifecycle.
Setting HTTP Status Codes
We can use the HttpServletResponse argument to set custom HTTP status codes as well.
Status codes are important because they let the client know the status of their request, and if any errors occured along the way.
Let’s create a handler that returns an error code to inform the client that the request failed:
import javax.servlet.http.HttpServletResponse;
import org.springframework.http.HttpStatus;

@SpringBootApplication
@RestController
public class DemoApplication {
	// ...
	// ...
	@GetMapping("/sample-error")
	public String sampleError(HttpServletResponse response) {
		// We can only set the status once. Here we set it to a 500, or internal server error status
		response.setStatus(HttpStatus.INTERNAL_SERVER_ERROR.value());
		// Along with the status code, we can return a plaintext body as the response
		return "error";
	}
}
This handler will always return an error. So making a call to:
GET http://localhost:8081/sample-errorWill give us the response:
HTTP/1.1 500
Content-Type: text/plain;charset=UTF-8
Content-Length: 5

error
Which will appear as an error on all standard HTTP clients.
Summary and Further Reading
This tutorial covered the basics of running a RESTful server application with Spring. Overall, you should be able to run a regular HTTP application using the concepts covered here.
You can also deploy your Java application on the cloud to access it from a public URL.
To learn more about Spring boot and the Spring framework in general, you can go to Spring.io, and view the API documentation.
You can view the complete code for this example on Github.