Table of Contents
This post describes how to make API calls in Typescript, and how we can support types and interfaces while calling REST APIs.
If you just want to see the example code, you can view it on Github
Typescript helps developers by providing static analysis and autocomplete features for their Javascript code. When calling REST APIs, the response is normally in a serialized JSON format.
When working with REST API calls in Typescript into two parts:
- Assigning a type to function that calls the API
- Assigning a type to the API response
As an example, let’s consider a REST API endpoint to get a list of users with their name and age. To do so, we will make a GET request to the /users.json endpoint.
The API response will be in JSON format:
[
  {
    "name": "Lorem",
    "age": 20
  },
  {
    "name": "Ipsum",
    "age": 18
  },
  {
    "name": "Dolor",
    "age": 35
  }
]
Let’s illustrate how we can support Typescript while making a REST API call to get the above list of users.
Creating an Interface for the API Response
Since we want a list of users, let’s create an interface for them:
interface User {
  name: string
  age: string
}
We’re using an interface here (instead of a class) because we want to cast each user object to the User type, and not create a new instance of a User class, as we’ll see in a later section.
For now, we’ll make a simple interface with the name and age fields corresponding to the data.
Assigning a Type to the API Call
In order to make the API call, we will use the browsers fetch API, which returns a Promise type.
In most cases, API calls are wrapped in functions to encapsulate the API call itself.
Since API calls are async, this function will return a Promise that resolves to an array of User types:
function getUsers(): Promise<User[]> {
  // Code for fetching users goes here
}
Assigning a Type to the API Response
Let’s fill in the getUsers function with the code for the API call:
function getUsers(): Promise<User[]> {
  // For now, consider the data is stored on a static `users.json` file
  return fetch('/users.json')
    // the JSON body is taken from the response
    .then(res => res.json())
    .then(res => {
      // The response has an `any` type, so we need to cast
      // it to the `User` type, and return it from the promise
      return res as User[]
    })
}
The important thing to remember is to cast the response type to the type you are expecting, and return it from the Promise callback.
Without these two steps, the Typescript compiler will give you an error, since the getUsers function is supposed to return a Promise<User[]> type.
Usage and Examples
Making a GET Request
Let’s take a look at the complete code for the above example, to fetch the list of users, and assign their names to an element in our HTML document:
interface User {
name: string
age: string
}
function getUsers(): Promise<User[]> {
// We can use the `Headers` constructor to create headers
// and assign it as the type of the `headers` variable
const headers: Headers = new Headers()
// Add a few headers
headers.set('Content-Type', 'application/json')
headers.set('Accept', 'application/json')
// Add a custom header, which we can use to check
headers.set('X-Custom-Header', 'CustomValue')
// Create the request object, which will be a RequestInfo type.
// Here, we will pass in the URL as well as the options object as parameters.
const request: RequestInfo = new Request('./users.json', {
method: 'GET',
headers: headers
})
// For our example, the data is stored on a static `users.json` file
return fetch(request)
// the JSON body is taken from the response
.then(res => res.json())
.then(res => {
// The response has an `any` type, so we need to cast
// it to the `User` type, and return it from the promise
return res as User[]
})
}
const result = document.getElementById('result')
if (!result) {
throw new Error('No element with ID `result`')
}
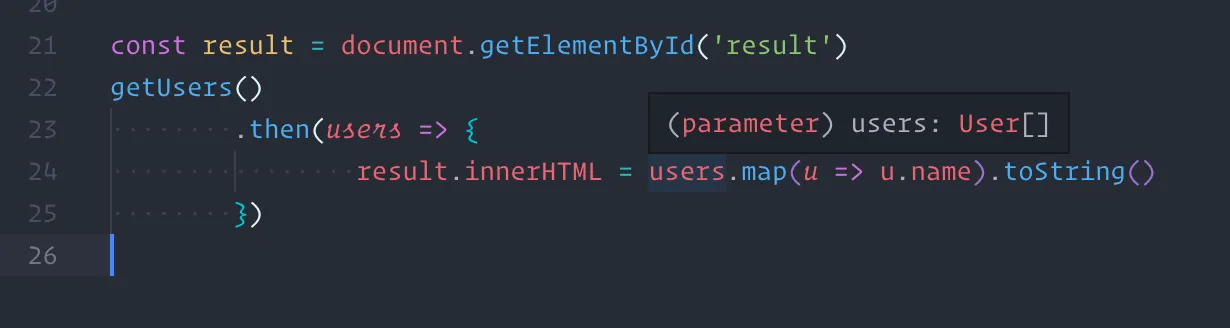
getUsers()
.then(users => {
result.innerHTML = users.map(u => u.name).toString()
})When we call the getUsers function, Typescript knows that we’re supposed to get back a list of User types, and so we can make use of type annotations:
as well as autocomplete:

I use VSCode as my editor, but Typescript annotations and autocompletion features are present in most popular text editors.
Adding Request Headers
In the previous section, we saw how to make a simple GET request. Let’s now see how we can add request headers to our API call.
In this case, instead of passing in the URL to the fetch function, we will pass in a Request object, which contains the URL, as well as some additional options, such as the request headers:
function getUsers(): Promise<User[]> {

  // We can use the `Headers` constructor to create headers
  // and assign it as the type of the `headers` variable
  const headers: Headers = new Headers()
  // Add a few headers
  headers.set('Content-Type', 'application/json')
  headers.set('Accept', 'application/json')
  // Add a custom header, which we can use to check
  headers.set('X-Custom-Header', 'CustomValue')

  // Create the request object, which will be a RequestInfo type.
  // Here, we will pass in the URL as well as the options object as parameters.
  const request: RequestInfo = new Request('./users.json', {
    method: 'GET',
    headers: headers
  })

  // Pass in the request object to the `fetch` API
  return fetch(request)
    .then(res => res.json())
    .then(res => {
      return res as User[]
    })
}
Let’s look at the types we used here:
- The Headers interface gives us methods to add and remove headers from the request.
- The RequestInfo type is a union type that can be either a string or a Request object. In our case, we are passing in a
Requestobject, with the URL and the options object.
Making a POST Request
Let’s now see how we can make a POST request, and send some data along with it.
For this example, let’s assume that the server has a POST /users endpoint, which accepts a User object in the request body, and creates a new user.
The code for this is similar to the previous example, except that we will pass in the data as the body parameter in the options object:
// Send a POST request to create a new user, which takes a `User` object
// as the parameter and returns a void promise (since we won't be using the result)
function createUser(user: User): Promise<void> {
  // Since this request will send JSON data in the body,
  // we need to set the `Content-Type` header to `application/json`
  const headers: Headers = new Headers()
  headers.set('Content-Type', 'application/json')
  // We also need to set the `Accept` header to `application/json`
  // to tell the server that we expect JSON in response
  headers.set('Accept', 'application/json')

  const request: RequestInfo = new Request('/users', {
    // We need to set the `method` to `POST` and assign the headers
    method: 'POST',
    headers: headers,
    // Convert the user object to JSON and pass it as the body
    body: JSON.stringify(user)
  })

  // Send the request and print the response
  return fetch(request)
    .then(res => {
      console.log("got response:", res)
    })
}

// Call the function and log a confirmation message
createUser({ name: 'New User', age: '30' })
  .then(() => {
    console.log("User created!")
  })
When creating the request, the body parameter is of type BodyInit, which is a union type that can also be a string. Since we are sending JSON data, we need to convert the User object to a JSON string using the JSON.stringify function.
Making PUT, DELETE and PATCH Requests
The code for making PUT, DELETE and PATCH requests is almost the same as the POST request example above. The only difference is that we need to change the method parameter in the options object:
const request: RequestInfo = new Request('/users', {
  method: 'PUT' // or DELETE or PATCH
  headers: headers,
  body: JSON.stringify(user)
})
The rest of the code remains the same.
If you want to see the complete working example, you can find the code on Github