Table of Contents
End to end testing is an often overlooked area of front-end web development. Yet, it is quintessential to making sure your application works the way it should. In this post, we will go through how to seamlessly set up and execute E2E tests using an awesome library called nightwatch.js, and in the process, automate screen capturing your application with each test run.
Initial Setup
Make a new project folder, and initialize your package.json file by running :
npm initThe first thing we have to do is install nightwatch :
npm install --save nightwatchNext, we must setup our selenium server and Chrome driver. Nightwatch just acts as a wrapper above selenium, which is what actually runs the browser automation under the hood. If we want to test on the Chrome browser, we will also have to install “chromedriver”.
Normally, you would have to download a couple of files and place them in the correct folder, but this approach would not be scalable if you had many people on your team and wanted a uniform installation process for everyone. Fortunately, there’s a node module called selenium-download, which automates this process for us.
Install it by running :
npm install --save selenium-downloadSetting up our configuration files
The first file we are going to make is a one-time setup file. This file utilizes the selenium-download module and downloads the selenium standalone server and chromedriver if they are not already present.
Make a new file called selenium-setup.js :
const selenium = require('selenium-download');

selenium.ensure(__dirname + '/bin', function (error) {
  if (error) console.error(error.stack);
  process.exit(0);
});
Next, create a nightwatch.json file. This is the default file nightwatch will look at for configuration.
{
  "src_folders": ["tests"],
  "output_folder": "reports",
  "custom_commands_path": "",
  "custom_assertions_path": "",
  "page_objects_path": "",
  "selenium": {
    "start_process": true,
    "server_path": "./bin/selenium.jar",
    "log_path": "./reports",
    "host": "127.0.0.1",
    "port": 4444,
    "cli_args": {
      "webdriver.chrome.driver": "./bin/chromedriver"
    }
  },
  "test_settings": {
    "default": {
      "launch_url": "",
      "silent": true,
      "desiredCapabilities": {
        "browserName": "chrome",
        "chromeOptions": {
          "args": ["window-size=1280,800", "disable-web-security", "test-type"]
        },
        "javascriptEnabled": true,
        "acceptSslCerts": true
      }
    }
  }
}src_folderstells nightwatch where to look for tests.selenium.server_pathdirects nightwatch to the server binary (which is donwloaded withselenium-download)
Modify your package.json file, so that the "scripts" section looks like this :
"scripts": {
  "test": "nightwatch",
  "e2e:setup": "node selenium-setup"
},
This will allow us to run npm test and npm run e2e:setup, which we will be using in a bit.
Writing test cases
Now comes the fun bit : writing our actual tests. Our nightwatch.json file is configured to look for and run all files inside the tests directory.
Let’s create an index.js file inside a newly made tests directory and write our test cases, to test the Google homepage :
module.exports = {

  //Each "export" counts as one test case
  'main': browser => {

    //We direct our browser to the google homepage, and wait for it to load
    browser.url('http://google.com')
      .waitForElementVisible('body', 1000)

    // We then test to see that the "Search" button is visible
    browser.assert.elementPresent('input[value="Google Search"]')

    //We then fill the search bar with the word "Nightwatch"
    browser.setValue('#lst-ib', 'Nightwatch')

    //then, we click on "Search", and wait for the search results to appear
    browser.click('input[value="Google Search"]')
      .waitForElementVisible('#resultStats', 1000)

    //Once thats done, we close the browser
    browser.end()
  }
}
If this is your first time running the tests, be sure to run :
npm run e2e:setup(You only have to run this command once to download the required binaries to your bin folder)
After which, you can run :
npm testThis will open the Chrome browser and run everything automatically.
Taking screenshots
This is actually the easiest part of this tutorial. All we need to do to take a screenshot is to add a saveScreenshot method call to our browser object.
module.exports = {
'main': browser => {
browser.url('http://google.com')
.waitForElementVisible('body', 1000)
browser.assert.elementPresent('input[value="Google Search"]')
// Take one screenshot at the homepage and save it as homepage.png
.saveScreenshot('./reports/homepage.png')
browser.setValue('#lst-ib', 'Nightwatch')
browser.click('input[value="Google Search"]')
.waitForElementVisible('#resultStats', 1000)
// Take another screenshot at the search result page and save it as search-result.png
.saveScreenshot('./reports/search-result.png')
browser.end()
}
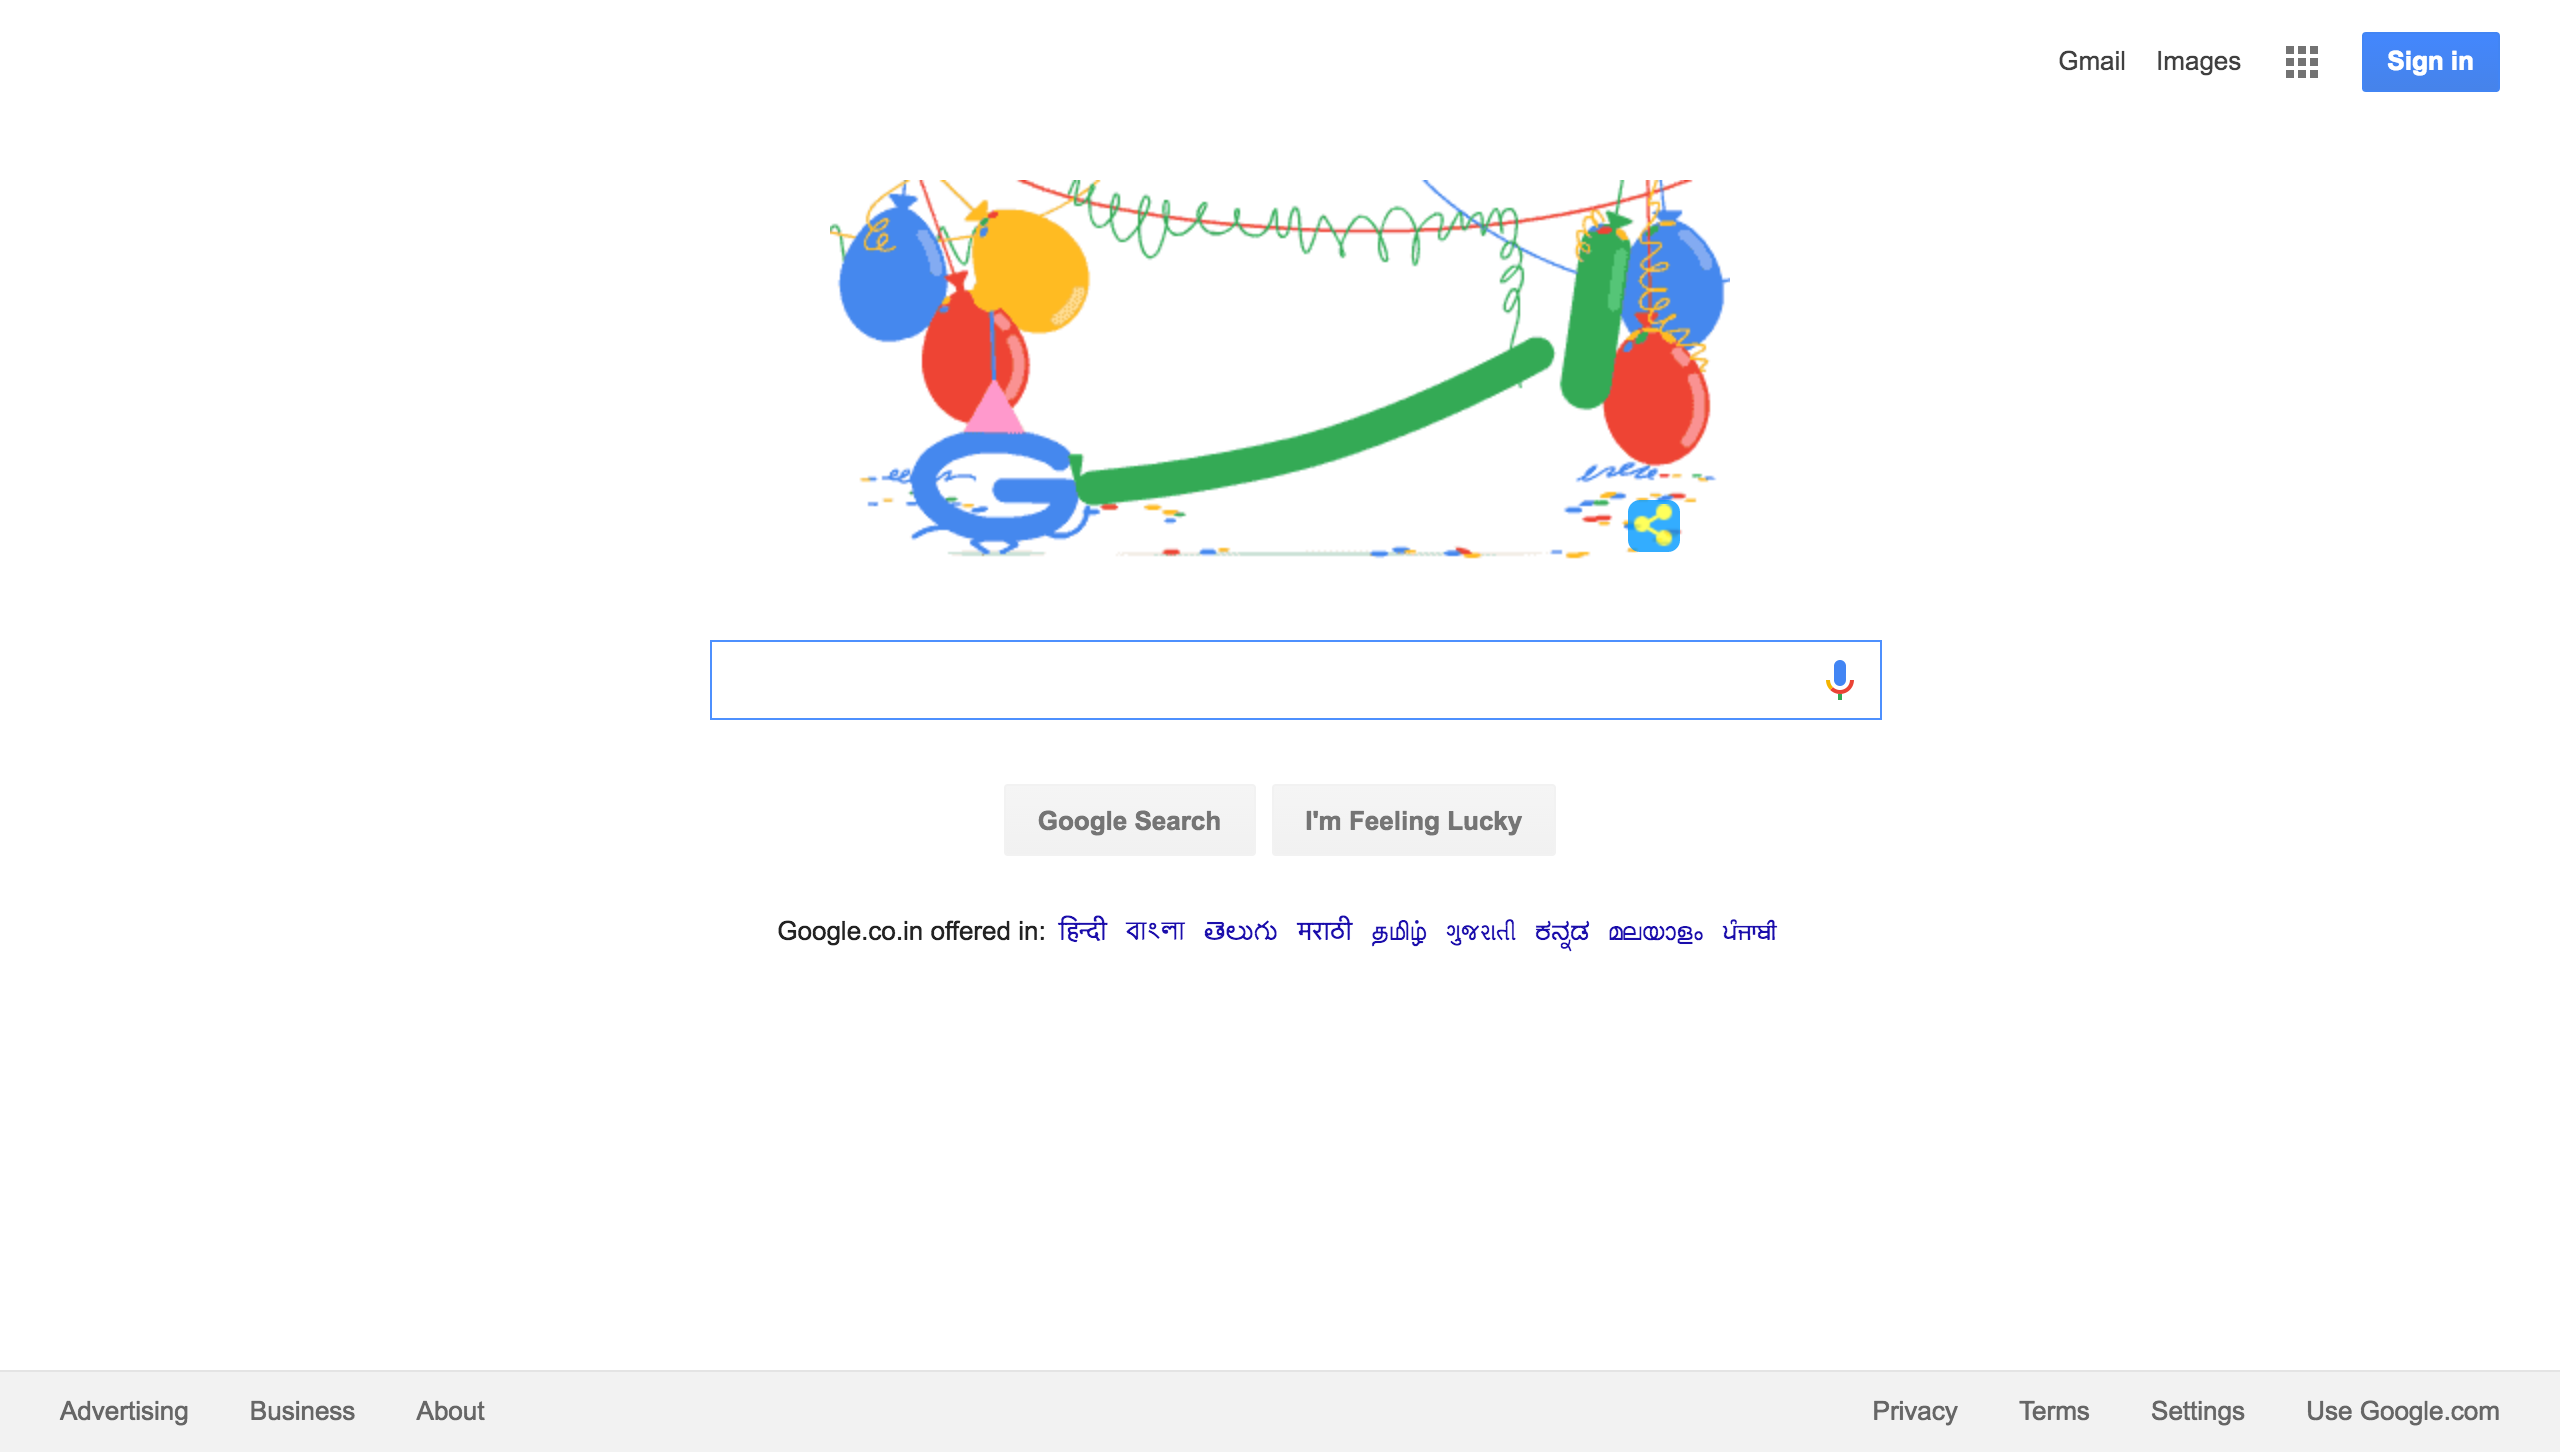
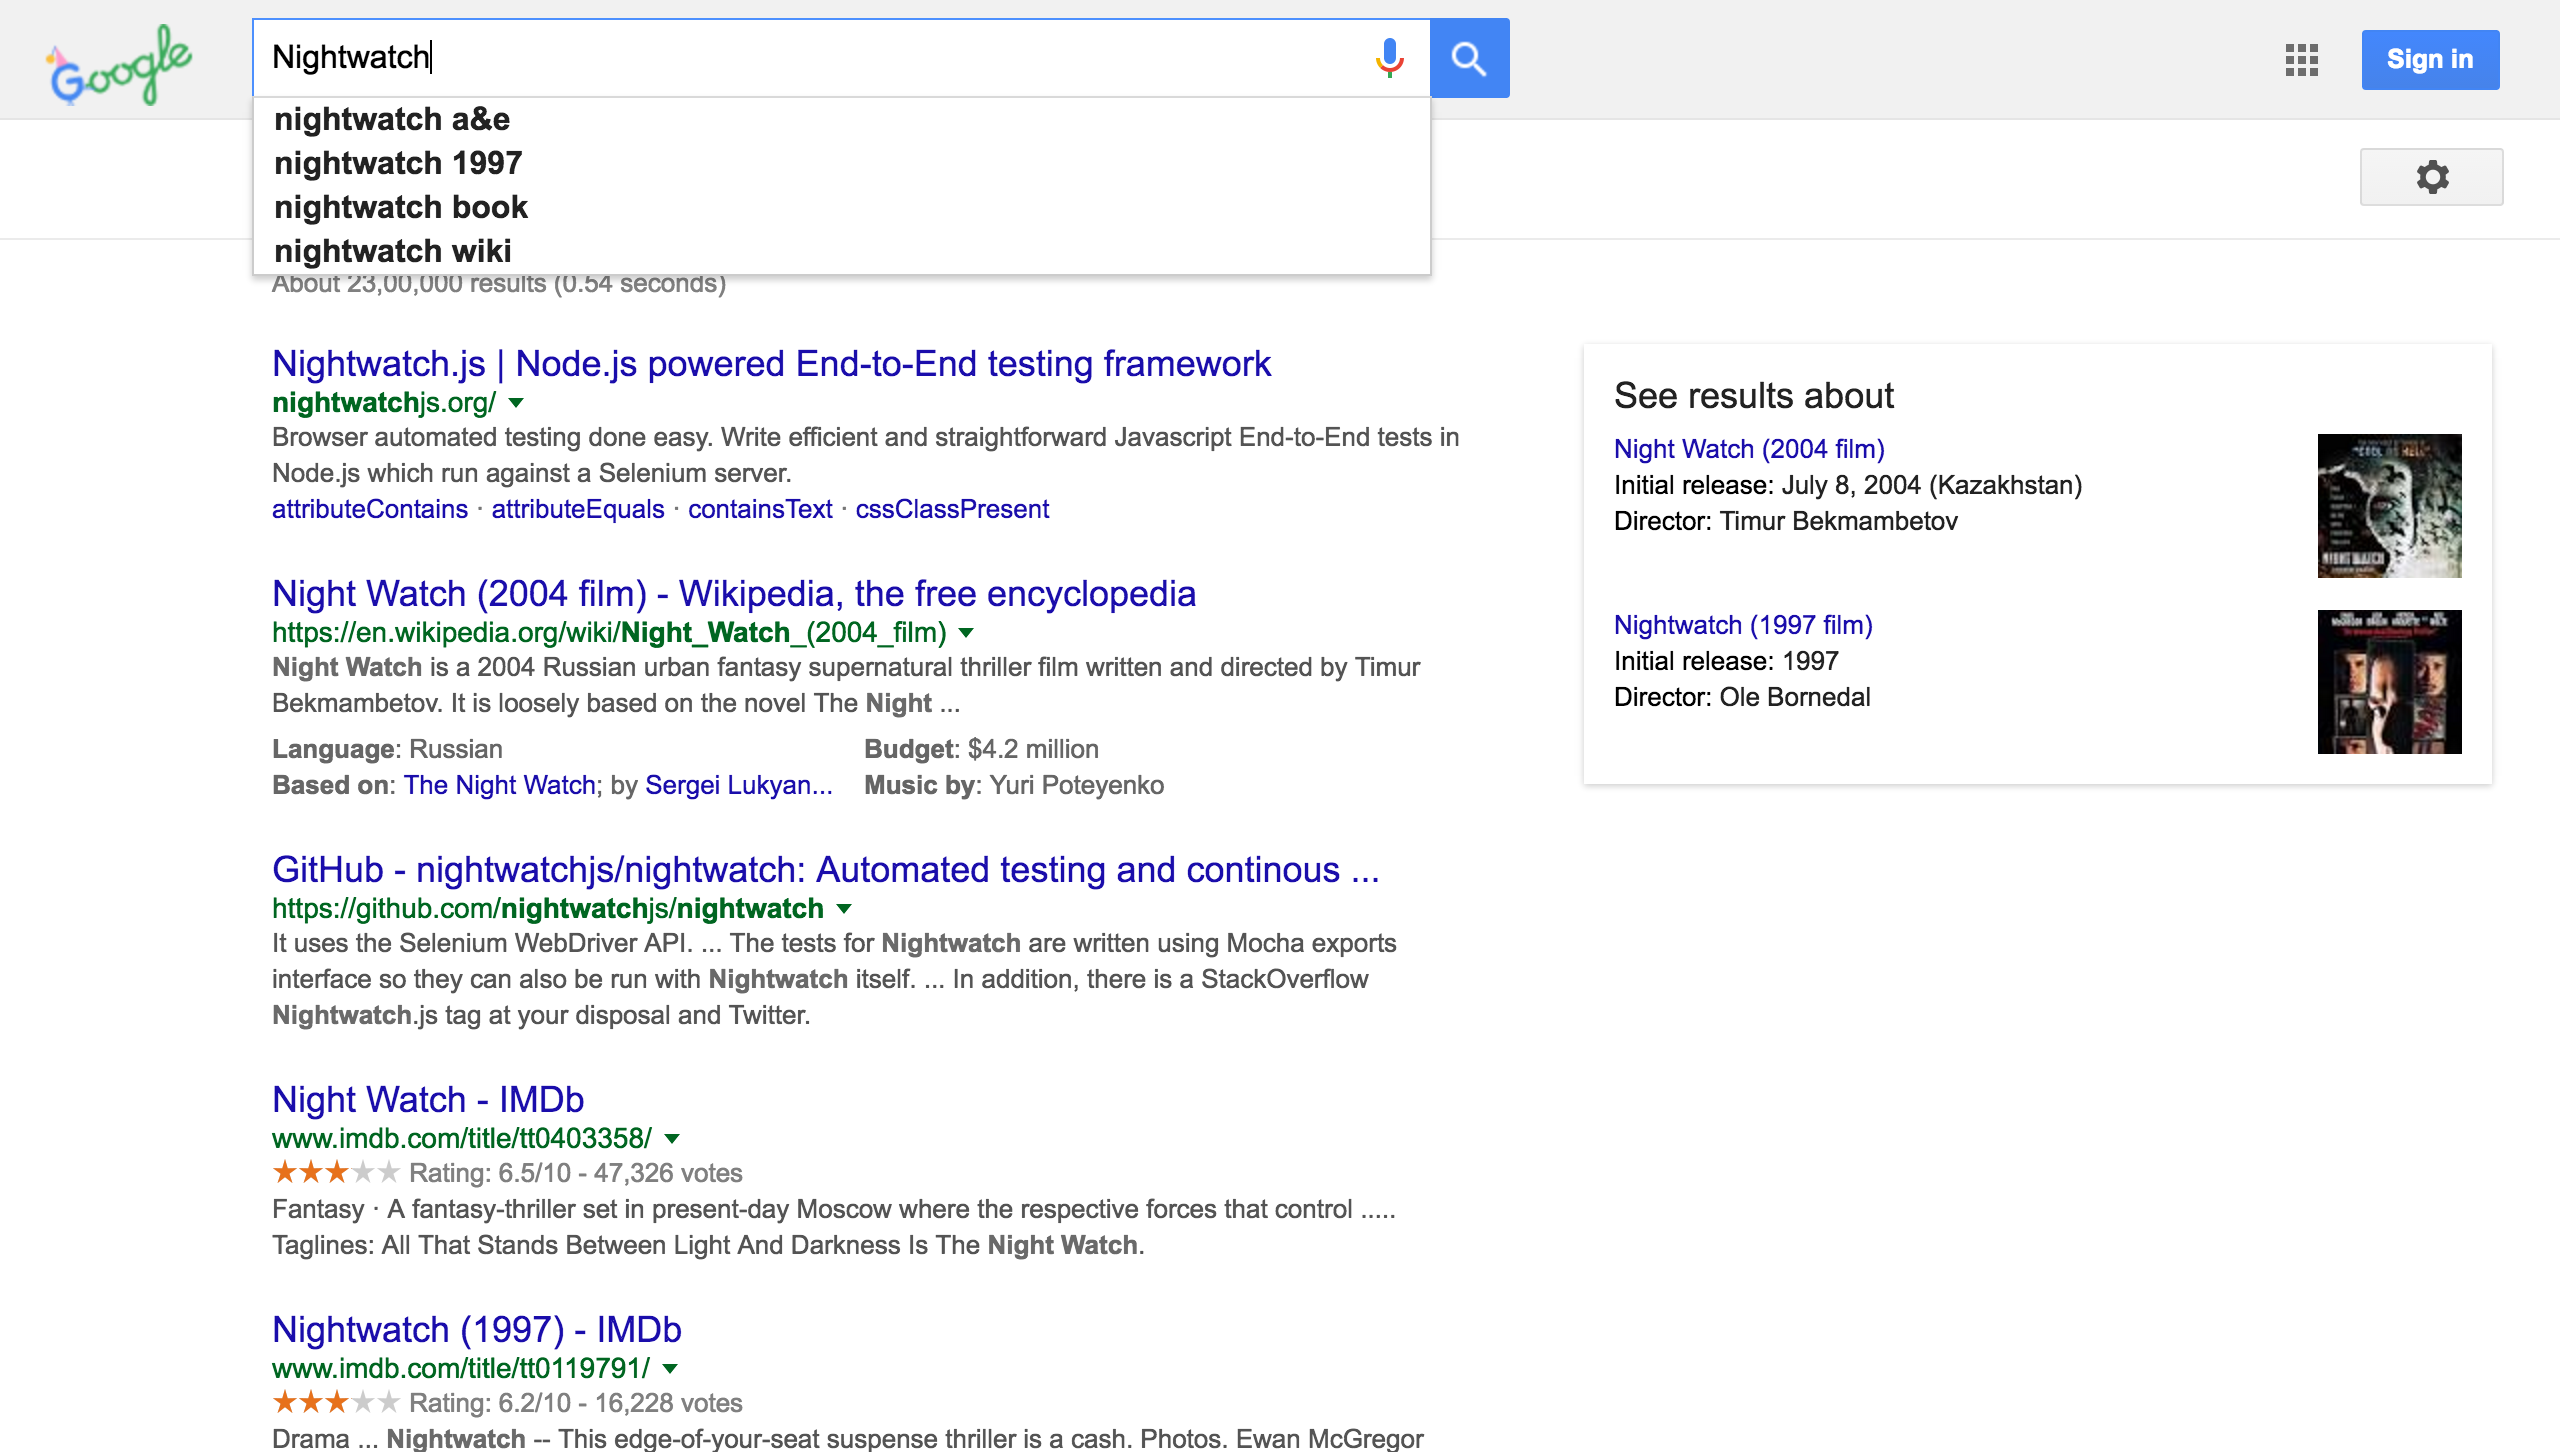
}Run npm test again, and watch your screenshots appear in the reports folder. Here is what they look like for me :
“homepage.png” :
“search-result.png” :
If you ever feel like you’re stuck or need a quick reference, you can find all the code, along with instructions on how to run it here