Table of Contents
AI models today are remarkably intelligent, capable of chatting, writing, and even reasoning like humans. However, when used purely as chat applications, their ability to interact with the world is limited to text-based responses. But what if we could empower these AI “brains” with “arms and legs” to perform actual tasks? This is precisely where the Model Context Protocol (MCP) comes into play.
MCP acts as a bridge, allowing AI models to interact with APIs, whether they’re online or running locally on your computer. This transforms AI from a passive conversationalist into an active agent capable of executing tasks.
In this guide, we’ll walk through building an MCP server using Spring Boot. This server will enable an AI model (specifically, Claude Sonnet via Claude Desktop) to manage a shopping list stored on your local system. By the end, you’ll be able to instruct your AI, “add two packets of milk to my shopping list,” and see it happen in real-time.
If you just want to see the code, you can find it on GitHub.
Understanding Model Context Protocol (MCP)
At its core, Model Context Protocol (MCP) is designed to extend the capabilities of AI models beyond simple text generation.
- AI as the Brain: The Large Language Model (LLM) acts as the central intelligence, understanding user requests and deciding on a course of action.
- MCP as the Bridge: MCP defines how the AI can discover and invoke “tools” or functions exposed by an MCP server.
- MCP Server as Arms and Legs: The MCP server hosts these tools, which are essentially functions that can interact with systems, APIs, or hardware.
This architecture allows the AI to delegate tasks. For example, instead of just saying “you should add milk to the list,” the AI can actively call a function on your MCP server to actually add milk to a list stored on your computer.
The Shopping List Project: An Overview
Our goal is to create a simple yet illustrative MCP-powered application: an AI-managed shopping list.
Here are the key components involved:
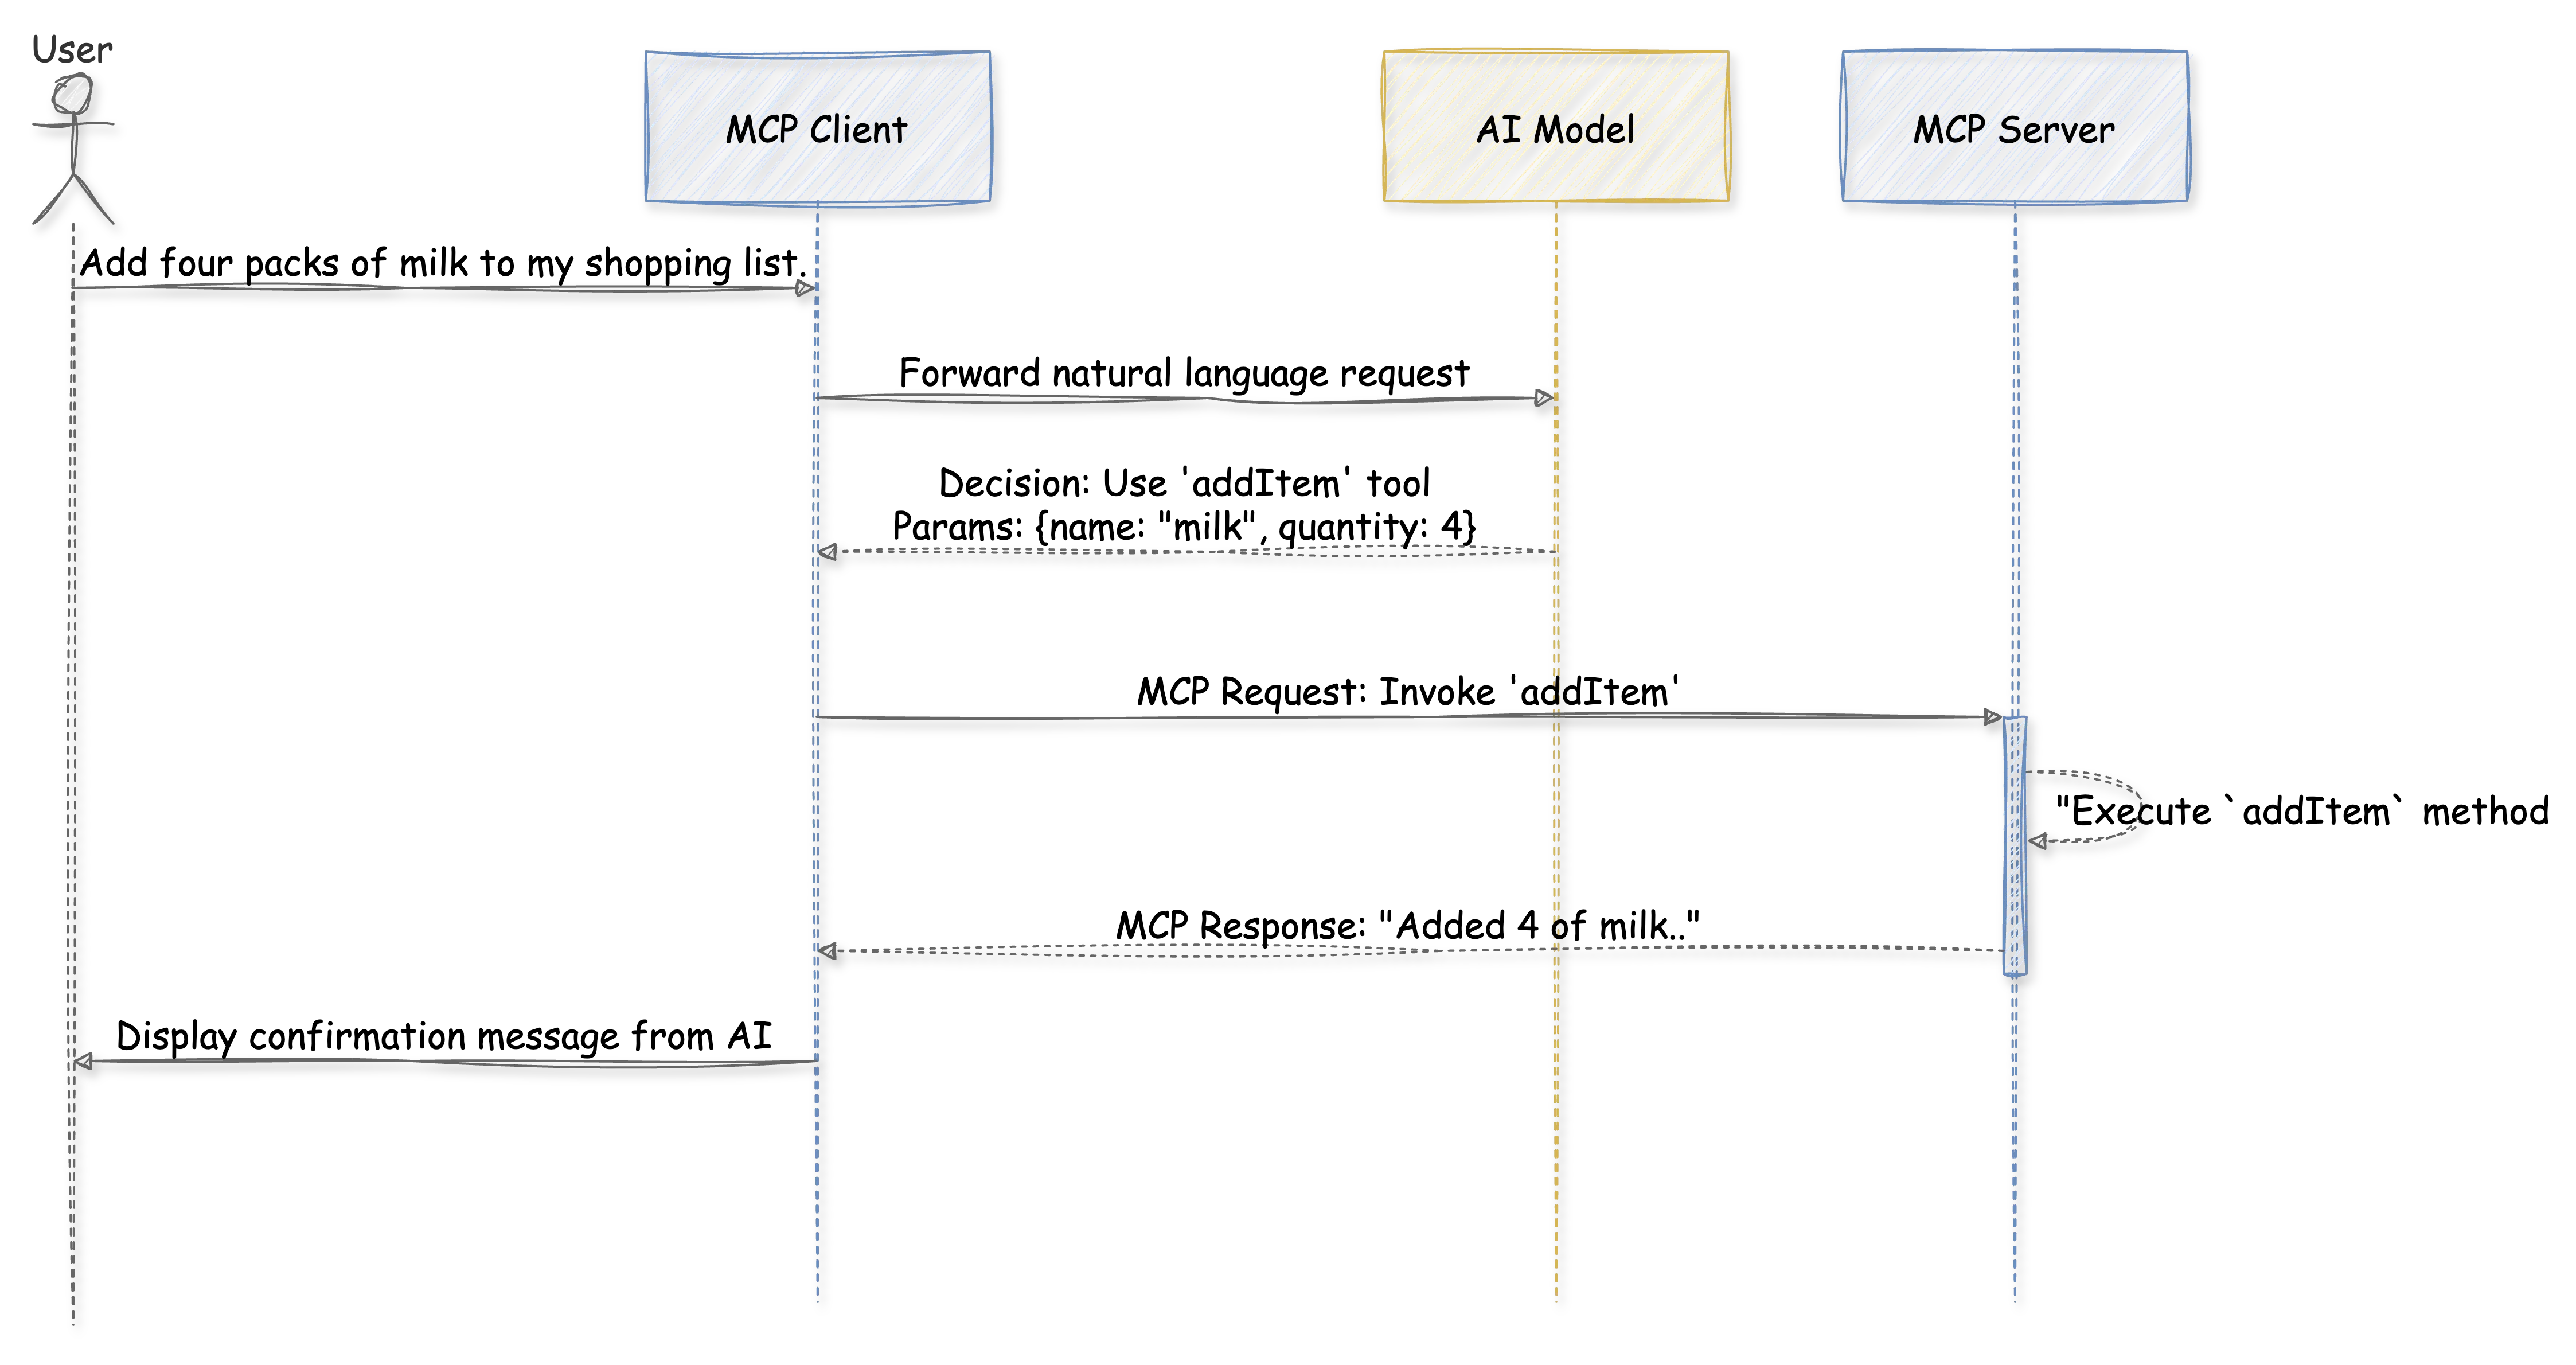
- MCP Client (Claude Desktop): This application communicates with the AI model and understands how to interact with MCP servers. For this tutorial, we’ll use Claude Desktop, which uses Claude Sonnet as its underlying AI.
- AI Model (Claude Sonnet): Hosted online, this is the LLM that processes natural language requests and determines when to use the tools provided by our MCP server.
- MCP Server (Spring Boot Application): This is what we’ll build. It’s a Java application running locally, exposing tools (methods) for managing a shopping list (add, remove, list items).
Setting Up the Spring Boot MCP Server
1. Spring Initializr and Dependencies
Start by heading to start.spring.io.
- Choose your preferred project type (Maven or Gradle), language (Java), and Spring Boot version.
- Set your project metadata (Group, Artifact, Name, Description).
- The crucial dependency to add is “Model Context Protocol Server”. Spring AI provides this.
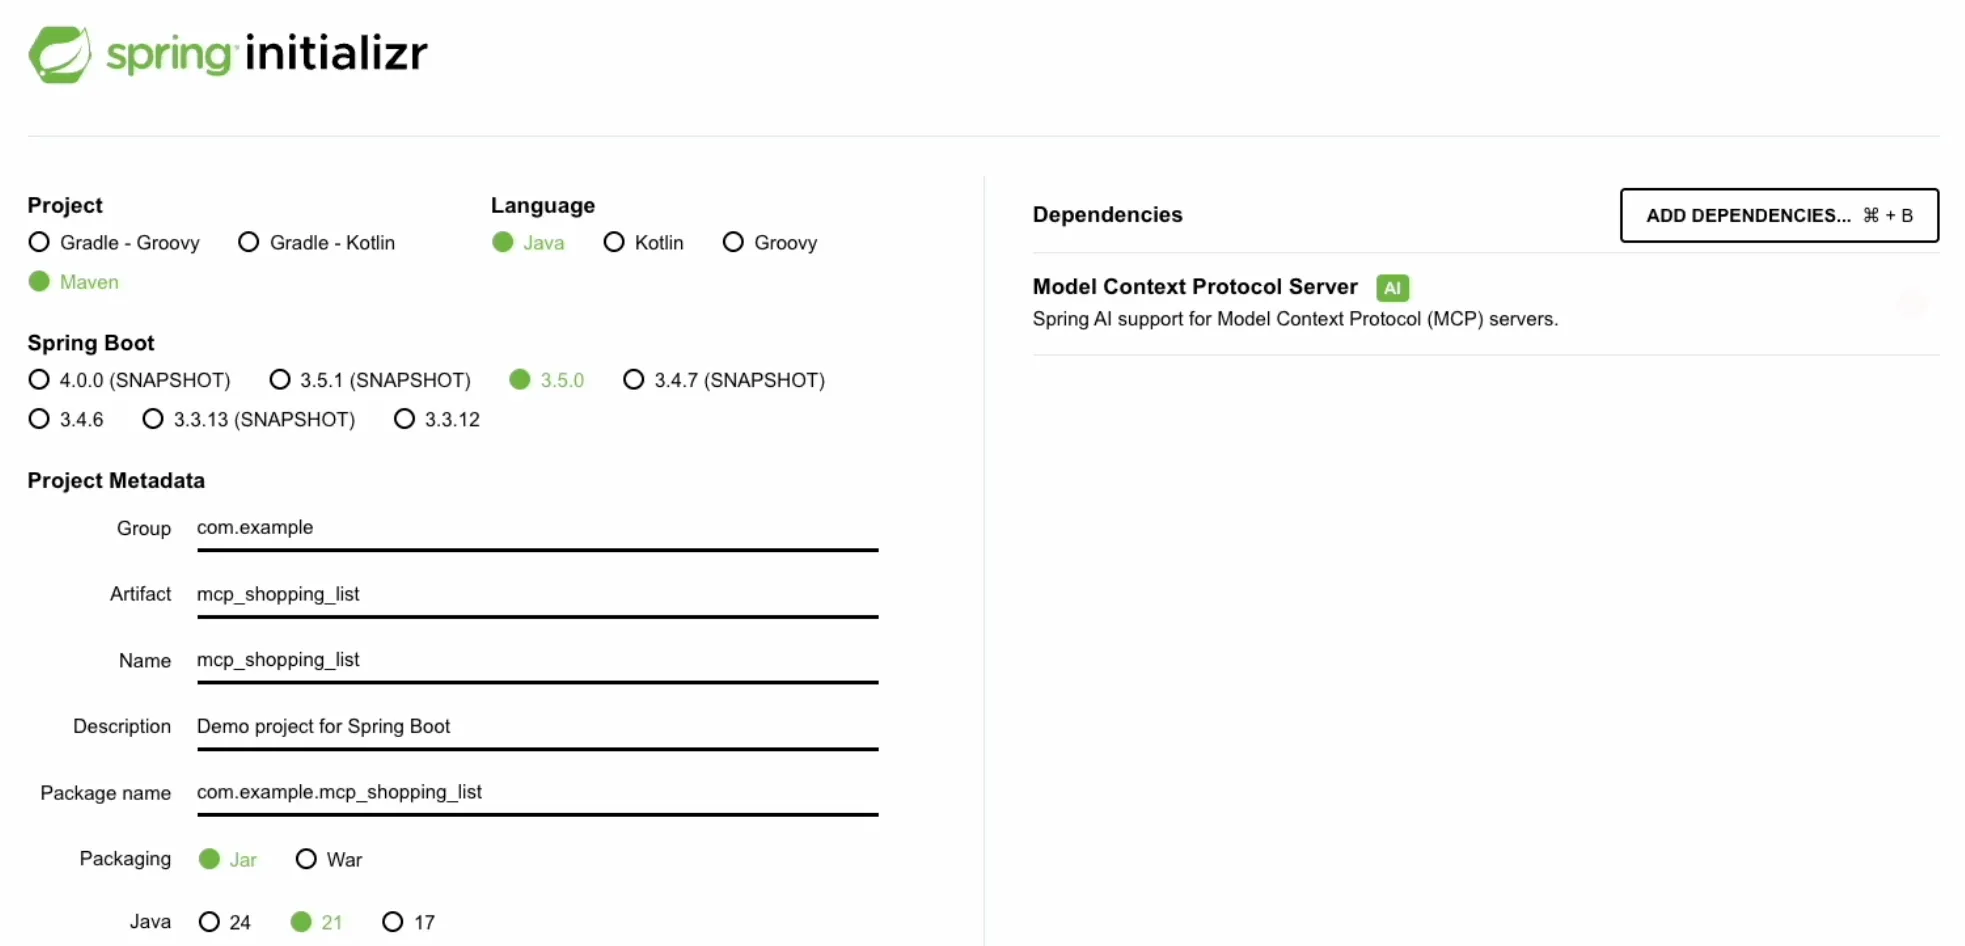 Once configured, download the generated project zip file and extract it.
Open the pom.xml file. You’ll see the added dependency:
<!-- pom.xml -->
<dependencies>
    <!-- Other Spring Boot dependencies -->
    <dependency>
        <groupId>org.springframework.ai</groupId>
        <artifactId>spring-ai-starter-mcp-server</artifactId>
    </dependency>

    <dependency>
        <groupId>org.springframework.boot</groupId>
        <artifactId>spring-boot-starter-test</artifactId>
        <scope>test</scope>
    </dependency>
</dependencies>

<!-- Ensure you have the Spring AI BOM for version management -->
<dependencyManagement>
    <dependencies>
        <dependency>
            <groupId>org.springframework.ai</groupId>
            <artifactId>spring-ai-bom</artifactId>
            <!-- Check for the latest Spring AI version compatible with your Spring Boot version -->
            <version>1.0.0</version>
            <type>pom</type>
            <scope>import</scope>
        </dependency>
    </dependencies>
</dependencyManagement>
Note: The transcript mentions version 1.0.0 for spring-ai.version. Always check the Spring AI documentation for the latest compatible versions.
2. Essential application.properties Configuration
The src/main/resources/application.properties file is vital for configuring how our MCP server behaves.
# src/main/resources/application.properties
spring.application.name=mcp-shopping-list

# MCP Server Configuration
spring.ai.mcp.server.type=SYNC
spring.ai.mcp.server.name=shopping-list-mcp-server
spring.ai.mcp.server.version=1.0.0

# Critical for STDIO communication
spring.main.web-application-type=none
spring.main.banner-mode=off
logging.pattern.console=

# Redirect standard logs to a file to keep STDIO clean
logging.file.name=./logs/mcp-shopping-list.log
Let’s break down these properties:
spring.application.name: A descriptive name for your application.spring.ai.mcp.server.type=SYNC: Configures the server to operate synchronously.spring.ai.mcp.server.nameandspring.ai.mcp.server.version: Helps MCP clients identify and version your server.spring.main.web-application-type=none: This is crucial. It tells Spring Boot not to start an embedded web server (like Tomcat). Our MCP server will communicate using Standard Input/Output (STDIO) instead of HTTP.spring.main.banner-mode=off: Disables the Spring Boot startup banner from printing to the console.logging.pattern.console=: Sets the console logging pattern to empty.- These last two settings (
banner-modeandlogging.pattern.console) are essential to prevent any extraneous Spring Boot logs from interfering with the JSON messages exchanged between the MCP client and server over STDIO.
- These last two settings (
logging.file.name: Redirects standard Spring Boot logs to a file, further ensuring STDIO remains clean for MCP communication.
Implementing the Shopping Cart Logic
Now, let’s write the Java code for our shopping list functionality.
1. The ShoppingCart Service and ShoppingItem
We’ll create a ShoppingCart class, annotated as a Spring @Service, to house our shopping list logic.
First, define a simple ShoppingItem record to represent items in our list:
// src/main/java/com/sohamkamani/mcp_shopping_list/ShoppingCart.java
package com.sohamkamani.mcp_shopping_list;

import java.util.ArrayList;
import java.util.List;
import java.util.Map;
import java.util.concurrent.ConcurrentHashMap;
import org.springframework.ai.tool.annotation.Tool;
import org.springframework.stereotype.Service;

@Service
public class ShoppingCart {

    // Define ShoppingItem as a nested record
    public record ShoppingItem(String name, int quantity) {
    }

    // Use a ConcurrentHashMap to store the shopping list items in memory
    private final Map<String, ShoppingItem> shoppingList = new ConcurrentHashMap<>();

    // ... methods will go here
}@Service: Marks this class as a Spring-managed service.ShoppingItem: A Java record to hold thenameandquantityof an item.shoppingList: AConcurrentHashMapto store our shopping items. Using aConcurrentHashMapis good practice for thread-safe operations, though for simple STDIO it might be overkill, it’s a robust choice.
2. Exposing Functionality with @Tool
How does the AI or MCP client know what our server can do? Through the @Tool annotation provided by Spring AI.
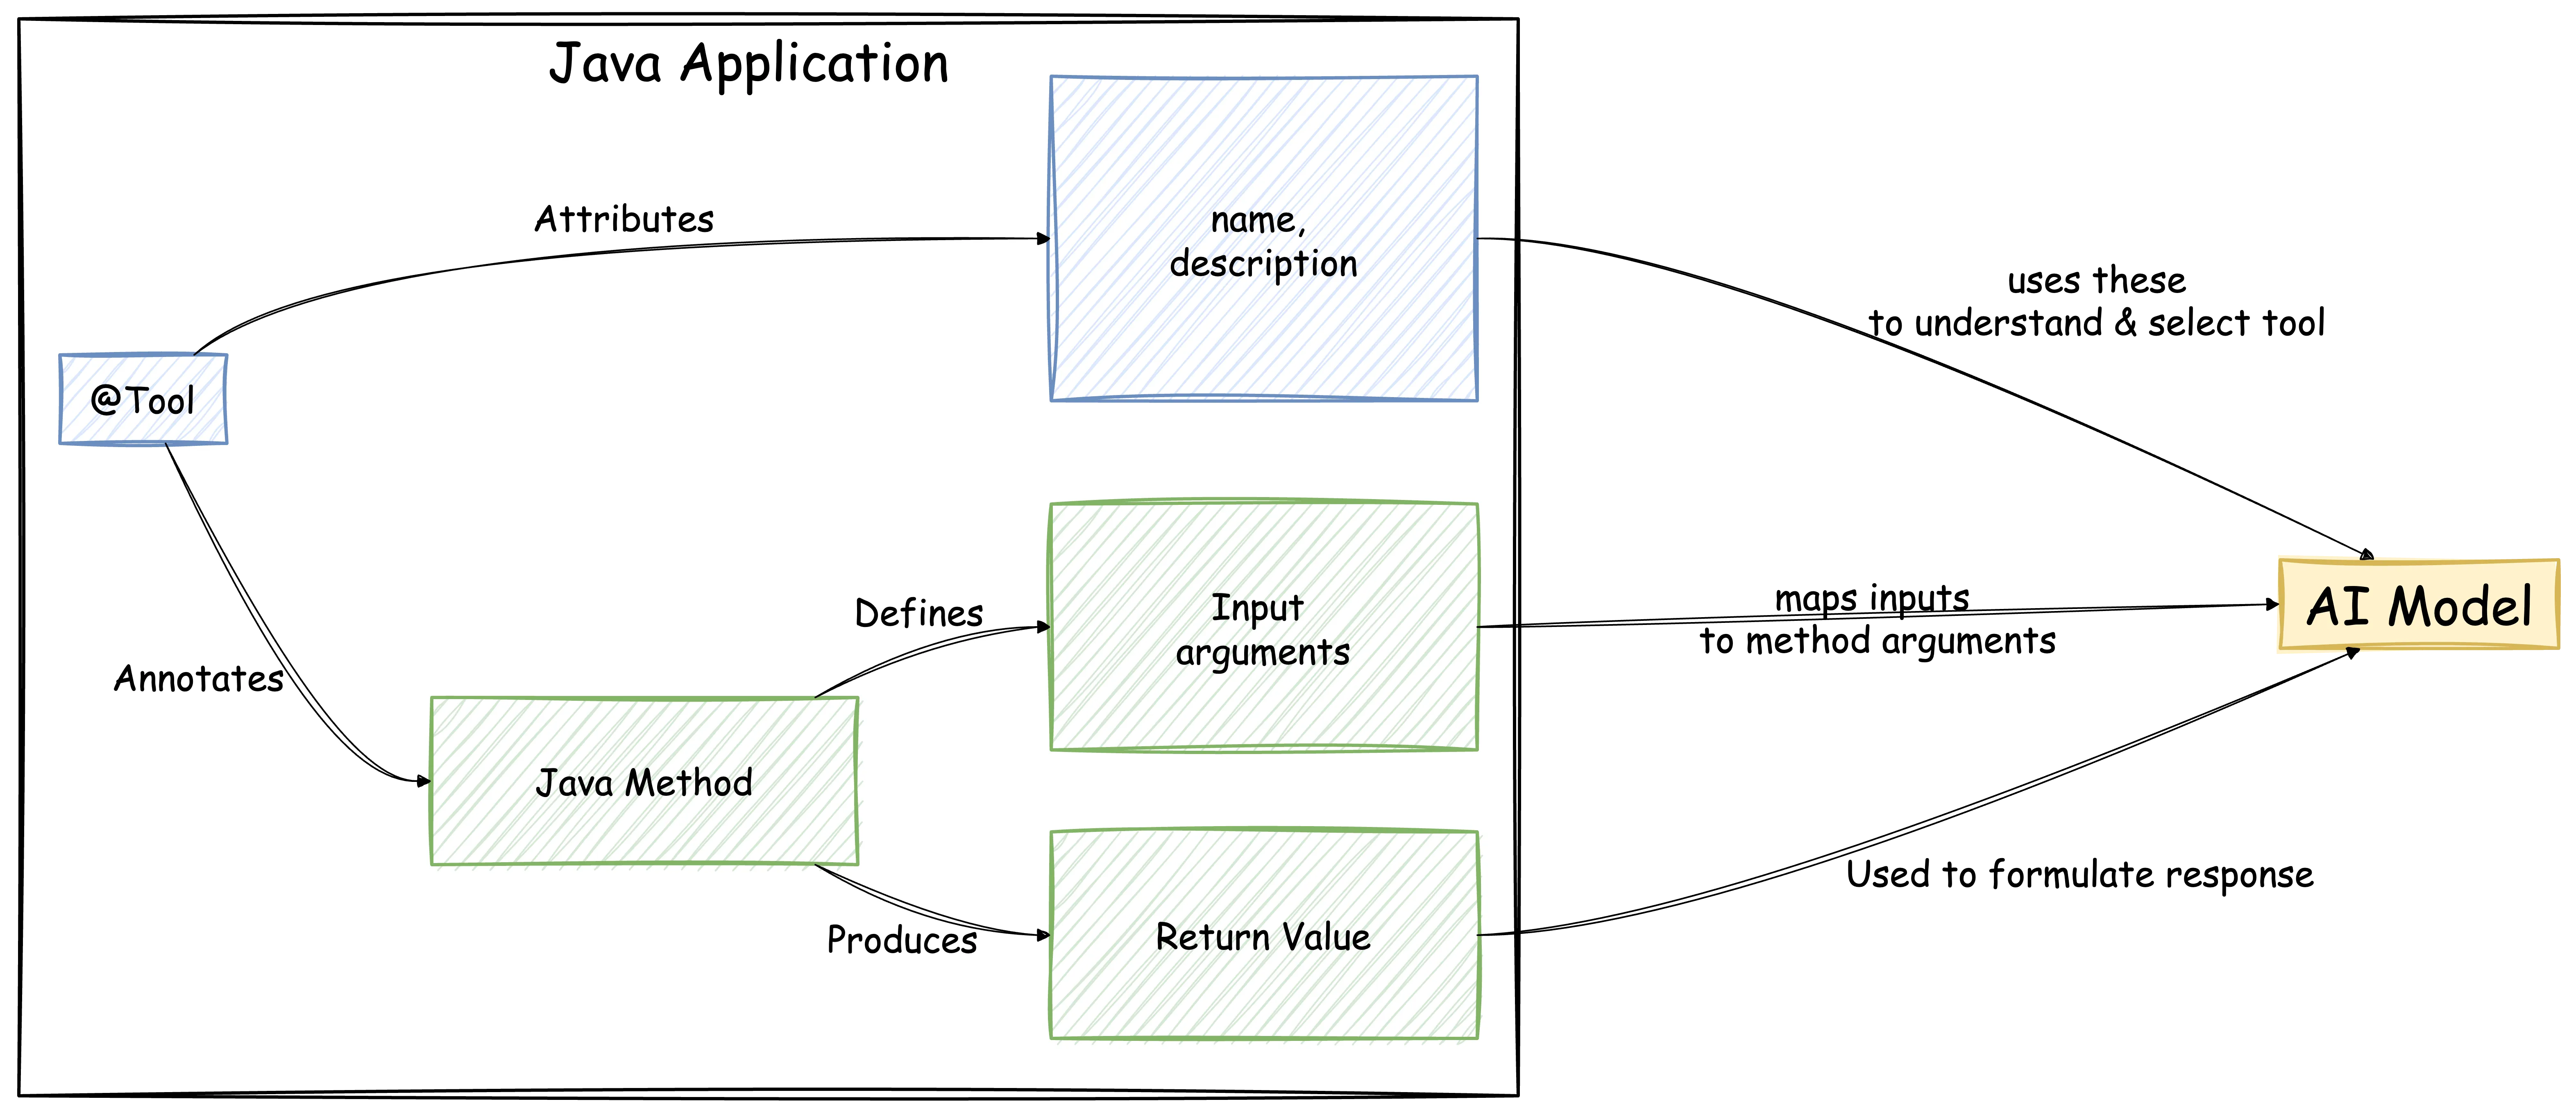
For each method in our ShoppingCart service that we want to expose to the AI, we’ll use @Tool.
name: A unique name for the tool.description: This is very important. The AI model uses this description to understand what the tool does and when to use it. Craft this carefully! It should clearly explain the tool’s purpose and any required parameters.
The names of your Java method parameters (e.g., name, quantity) are also significant. Spring AI typically uses these exact names to map the inputs that the AI extracts from the user’s natural language request to the tool’s arguments.
The return value of your Java method will be serialized (often to JSON if it’s an object, or passed as a string) and sent back to the AI model. The AI then uses this information to formulate its response to the user or to make further decisions.
3. Implementing Shopping Cart Methods
Let’s implement the addItem method:
// Inside ShoppingCart.java

/**
 * Adds an item to the shopping list or updates the quantity if it already exists.
 *
 * @param name The name of the item.
 * @param quantity The quantity to add.
 * @return A confirmation message.
 */
@Tool(name = "addItem",
      description = "Add an item to the shopping list or update its quantity. Specify item name and quantity.")
public String addItem(String name, int quantity) {
    if (name == null || name.trim().isEmpty() || quantity <= 0) {
        return "Error: Invalid item name or quantity.";
    }
    // Using toLowerCase for case-insensitive item matching
    shoppingList.compute(name.toLowerCase(), (key, existingItem) -> {
        if (existingItem == null) {
            return new ShoppingItem(name, quantity); // Store original name casing
        } else {
            // Update quantity, keep original name
            return new ShoppingItem(existingItem.name(), existingItem.quantity() + quantity);
        }
    });
    return "Added " + quantity + " of " + name + " to the shopping list.";
}
We also need methods to get all items and remove items. Here are their signatures and @Tool annotations (full implementation in the provided codebase):
// Inside ShoppingCart.java

/**
 * Gets all items currently in the shopping list.
 *
 * @return A list of all shopping items.
 */
@Tool(name = "getItems",
      description = "Get all items currently in the shopping list. Returns a list of items with their names and quantities.")
public List<ShoppingItem> getItems() {
    return new ArrayList<>(shoppingList.values());
}

/**
 * Removes a specified quantity of an item from the shopping list, or removes the item entirely.
 *
 * @param name The name of the item to remove.
 * @param quantity The quantity to remove.
 * @return A confirmation or error message.
 */
@Tool(name = "removeItem",
      description = "Remove a specified quantity of an item from the shopping list. Specify item name and quantity to remove. If quantity is not specified or is greater than item quantity, the item is removed.")
public String removeItem(String name, int quantity) {
    // Implementation details:
    // - Handle null/empty name.
    // - Find item (case-insensitive).
    // - If item not found, return error.
    // - If quantity to remove is invalid or >= current quantity, remove item.
    // - Otherwise, decrement quantity.
    // - Return confirmation.
    // (Refer to the provided source code for the full implementation)
    if (name == null || name.trim().isEmpty()) {
      return "Error: Invalid item name.";
    }
    String lowerCaseName = name.toLowerCase();
    ShoppingItem item = shoppingList.get(lowerCaseName);

    if (item == null) {
      return "Error: Item '" + name + "' not found in the shopping list.";
    }

    if (quantity <= 0 || quantity >= item.quantity()) {
      shoppingList.remove(lowerCaseName);
      return "Removed '" + name + "' from the shopping list.";
    } else {
      shoppingList.put(lowerCaseName, new ShoppingItem(item.name(), item.quantity() - quantity));
      return "Removed " + quantity + " of '" + name + "'. Remaining quantity: "
          + shoppingList.get(lowerCaseName).quantity() + ".";
    }
}
Exposing Tools to the MCP Client
How does the MCP client discover the tools we’ve defined in ShoppingCart? This is handled in our main application class.
// src/main/java/com/sohamkamani/mcp_shopping_list/McpShoppingListApplication.java
package com.sohamkamani.mcp_shopping_list;

import java.util.List;
import org.springframework.ai.support.ToolCallbacks;
import org.springframework.ai.tool.ToolCallback;
import org.springframework.boot.SpringApplication;
import org.springframework.boot.autoconfigure.SpringBootApplication;
import org.springframework.context.annotation.Bean;

@SpringBootApplication
public class McpShoppingListApplication {

	public static void main(String[] args) {
		SpringApplication.run(McpShoppingListApplication.class, args);
	}

	// This bean exposes our ShoppingCart tools to the MCP framework
	@Bean
	public List<ToolCallback> shoppingCartToolCallbacks(ShoppingCart shoppingCart) {
		// The ShoppingCart service is auto-injected by Spring
		return ToolCallbacks.from(shoppingCart);
	}
}@SpringBootApplication: Standard Spring Boot annotation.shoppingCartToolCallbacksBean: This method, annotated with@Bean, is crucial. It takes ourShoppingCartservice (which Spring Boot auto-injects) and usesToolCallbacks.from(shoppingCart)to create a list ofToolCallbackobjects. This list is how the Spring AI MCP framework discovers and registers the@Tool-annotated methods from ourShoppingCartservice.
Running and Testing the MCP Server
With the code in place, let’s get our server running and test it.
1. Running the Spring Boot Application
Open your terminal in the project’s root directory and run:
./mvnw spring-boot:run(Or mvn spring-boot:run if you don’t have the Maven wrapper, or use your IDE’s run command).
You should see some Spring Boot startup logs (which will be minimal on the console due to our application.properties settings). If there are no major errors, your MCP server is running and waiting for an MCP client to connect via STDIO.
2. Packaging as a JAR (for Claude Desktop)
To make it easier to configure with Claude Desktop, let’s package the application into an executable JAR file:
./mvnw packageThis command will compile your code and create a JAR file in the target/ directory (e.g., mcp-shopping-list-0.0.1-SNAPSHOT.jar).
3. Configuring Claude Desktop
Now, we need to tell Claude Desktop how to start our MCP server.
- Open Claude Desktop.
- Go to Settings -> Developer Settings.
- Click the button to edit the JSON configuration file.
- You’ll need to add an entry for your server. The command will be to execute the JAR file we just built.
Here’s an example of what the configuration might look like in the JSON file (adapt the path to your JAR file):
{
  // ... other Claude Desktop settings ...
  "experimental_mcp_servers": [
    {
      "name": "Local Shopping List Server",
      "command": ["java", "-jar", "/path/to/your/java-mcp-server-example/target/mcp-shopping-list-0.0.1-SNAPSHOT.jar"],
      "description": "Manages a local shopping list."
    }
    // ... other servers ...
  ]
}
Replace /path/to/your/java-mcp-server-example/target/mcp-shopping-list-0.0.1-SNAPSHOT.jar with the actual absolute path to your compiled JAR file.
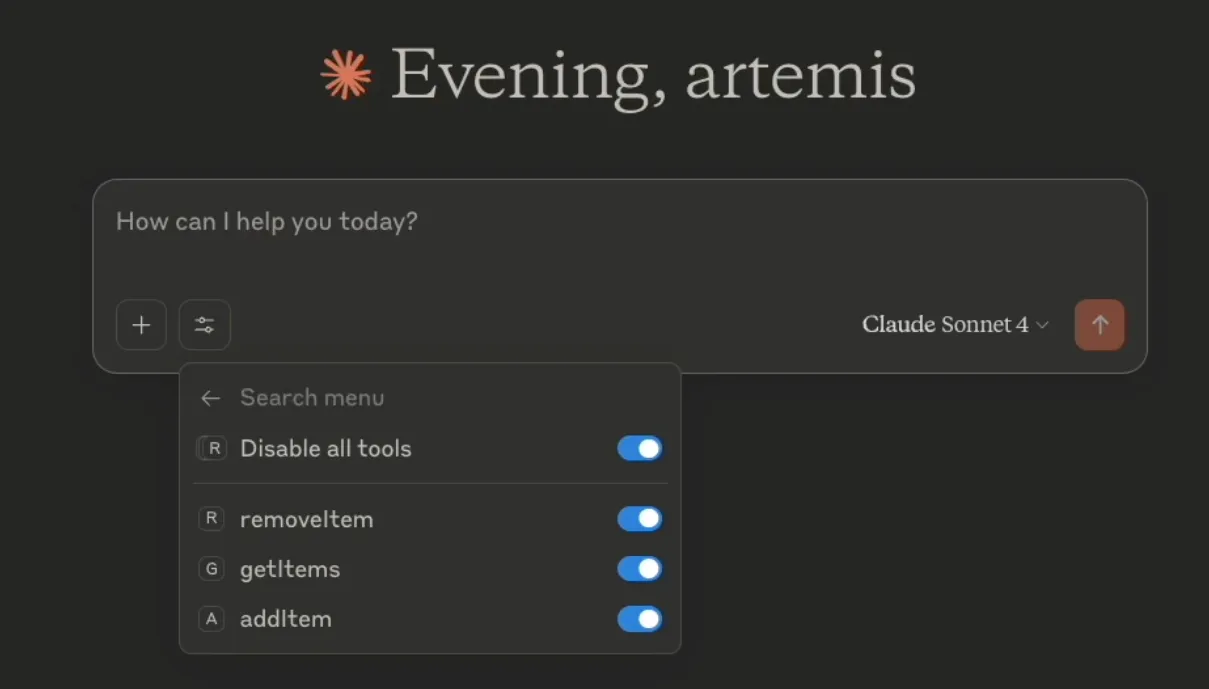
After saving the JSON configuration, restart Claude Desktop. Your server should now appear in the tool menu within Claude Desktop, listing the methods (addItem, getItems, removeItem) we defined with the @Tool annotation.
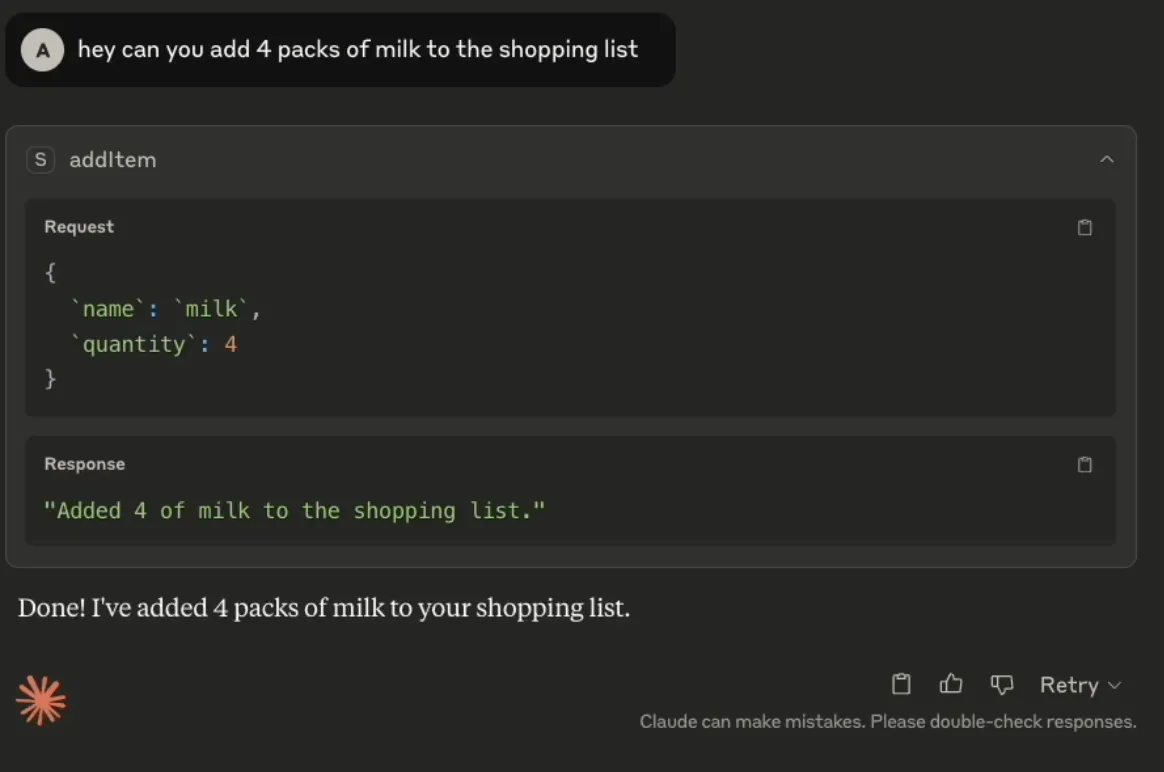
4. Testing with Natural Language
Let’s try it out! In Claude Desktop, start a new chat and type:
“Add four packs of milk to my shopping list.”
You should see that Claude Desktop recognizes the intent, identifies that your “Local Shopping List Server” has an addItem tool, and calls it. Your Spring Boot application will execute the addItem method, and Claude will respond with a confirmation, perhaps based on the string returned by your method.
Try other commands:
“Can you add 1 loaf of bread and 2 dozen eggs?” “What’s on my shopping list?”
When you ask “What’s on my shopping list?”, Claude Desktop will call the getItems tool on your MCP server. The server will return the list of ShoppingItem objects (likely serialized as JSON), which Claude then uses to present the information to you in a natural way.
A key feature here is persistence within the session of your running MCP server. If you add items, then start a new chat in Claude Desktop (while your Spring Boot MCP server is still running), and ask “what’s on my shopping list?”, it will retrieve the items you added earlier because they are stored in the ConcurrentHashMap on your local machine.
If things don’t work as expected, the transcript mentions debugging by looking at the exact request and response sent to the MCP server. Claude Desktop or similar MCP clients might offer ways to inspect these messages.
The Power of MCP and Spring AI
This simple shopping list example only scratches the surface. The true power of MCP lies in its ability to let any AI model act as a “brain” to reason about what needs to be done, while your MCP server performs the actual “actions.”
Imagine the possibilities:
- Interacting with your local file system.
- Controlling smart home devices.
- Querying local databases.
- Even interfacing with physical systems, like a robot arm.
Frameworks like Spring AI make it incredibly straightforward to create MCP servers from scratch, handling much of the underlying protocol complexity so you can focus on defining your tools and their logic.
If you want to see the complete working code, you can find it on GitHub.