Table of Contents
In this post, we will learn how to set up a MongoDB replica set using Docker. We will also learn how to use docker-compose to automate this process.

When storing data in MongoDB, we can have multiple Mongo servers (called replicas) that hold a copy of the stored data. This way, even if one of the servers goes down, we have a backup to retrieve data from.
This technique is used to make applications more resilient to database failures, since the application can keep running even if a single database server fails.
If you just want to see the final
docker-compose.ymlfile, you can skip ahead
Installation
First, we need to install Docker on our system. If you’re using your personal computer, you can install Docker desktop.
To verify that you have docker installed run :
docker -vThis should output the version number.
Next, we need to make sure our docker daemon is running. If you run the command:
docker imagesYou should be able to see the list of images you currently have on your system.
Next, we will get the latest version of the official Mongo image, by running
docker pull mongoGreat! Now we’re all set to configure our Mongo servers.
Replica Architecture Overview
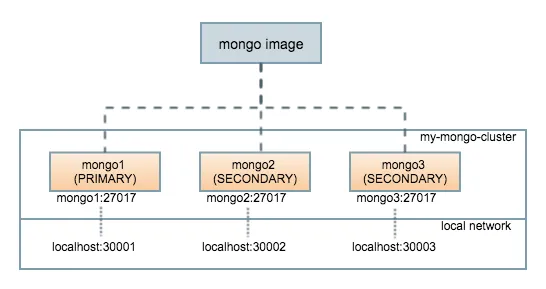
We are going to have three containers from the Mongo image, which are all inside their own Docker container network.
Let’s name them mongo1, mongo2, and mongo3. These will be the three Mongo instances of our replica set.
We are also going to expose each of them to our local machine, so that we can access them using the Mongo shell interface from our local machine.
Each of the three Mongo containers should be able to communicate with all other containers in the network.

Creating a New Network
To see all networks currently on your system, run the command
$ docker network ls
NETWORK ID          NAME                DRIVER              SCOPE
2a4e341c6039        bridge              bridge              local
4fbef5286425        host                host                local
8062e4e7cdca        none                null                local
We will be adding a new network called my-mongo-cluster :
$ docker network create my-mongo-clusterThe new network should now be added to your list of networks :
$ docker network ls
NETWORK ID          NAME                DRIVER              SCOPE
2a4e341c6039        bridge              bridge              local
4fbef5286425        host                host                local
f65e93c94e42        mongo-cluster       bridge              local
8062e4e7cdca        none                null                local
Setting up Our Containers
To start up our first container, mongo1 run the command:
$ docker run \
-p 30001:27017 \
--name mongo1 \
--net my-mongo-cluster \
mongo mongod --replSet my-mongo-set
Let’s see what each part of this command does :
docker run: Start a container from an image-p 30001:27017: Expose port 27017 in our container, as port 30001 on the localhost--name mongo1: name this container “mongo1”--net my-mongo-cluster: Add this container to the “my-mongo-cluster” network.mongo: the name of the image we are using to spawn this containermongod --replSet my-mongo-set: Run mongod while adding this mongod instance to the replica set named “my-mongo-set”
Set up the other 2 containers by running :
$ docker run \
-p 30002:27017 \
--name mongo2 \
--net my-mongo-cluster \
mongo mongod --replSet my-mongo-set

$ docker run \
-p 30003:27017 \
--name mongo3 \
--net my-mongo-cluster \
mongo mongod --replSet my-mongo-set
Remember to run each of these commands in a separate terminal window, since we are not running these containers in a detached state
Configuring Database Replication
Now that we have all our Mongo instances up and running, let’s add them to a replica set.
Connect to the Mongo shell in any of the containers.
docker exec -it mongo1 mongoThis command will open up the Mongo shell in our running mongo1 container (but you can also run it from the mongo2 or mongo3 container as well).
Inside the Mongo shell, we first create our configuration :
MongoDB shell version v5.0.8
> db = (new Mongo('localhost:27017')).getDB('test')
test
> config = {
  	"_id" : "my-mongo-set",
  	"members" : [
  		{
  			"_id" : 0,
  			"host" : "mongo1:27017"
  		},
  		{
  			"_id" : 1,
  			"host" : "mongo2:27017"
  		},
  		{
  			"_id" : 2,
  			"host" : "mongo3:27017"
  		}
  	]
  }
The first _id key in the config, should be the same as the --replSet flag which was set for our mongod instances, which is my-mongo-set in our case. We then list all the members we want in our replica set.
Since we added all our Mongo instances to our docker network. Their name in each container resolver to their respective IP addresses in the my-mongo-cluster network.
Finally, start the replica set by running the following command in the Mongo shell:
> rs.initiate(config)
{ "ok" : 1 }
If the command succeeds, your prompt should change to reflect that the current database is part of a replice set:
my-mongo-set:PRIMARY>This means that the shell is currently associated with the PRIMARY database in our my-mongo-set cluster.
Let’s play around with our new replica set to make sure it works as intended.
(I am omitting the my-mongo-set:PRIMARY> prompt for readability)
First, let’s insert a document into our primary database :
> db.mycollection.insert({name : 'sample'})
WriteResult({ "nInserted" : 1 })
> db.mycollection.find()
{ "_id" : ObjectId("57761827767433de37ff95ee"), "name" : "sample" }
We then make a new connection to one of our secondary databases (located on mongo2) and check if our document has been replicated:
> db2 = (new Mongo('mongo2:27017')).getDB('test')
test
> db2.setSecondaryOk()
> db2.mycollection.find()
{ "_id" : ObjectId("57761827767433de37ff95ee"), "name" : "sample" }
We run the
db2.setSecondaryOk()command to let the shell know that we are intentionally querying a database that is not our primary.
Looks like the same document is present in our secondary as well.
Using Docker Compose
We can automate the steps described above using Docker compose.
First, we need to create a docker-compose.yml file that declares the three replica servers, as well as a initialization server that runs the code to configure the replica sets:
services:
# first, we define the three mongo servers that will act as replicas
# here, we steup the hostname ports, and startup command
# which is the same as discussed in the previous section
  mongo1:
    hostname: mongo1
    image: mongo
    expose:
      - 27017
    ports:
      - 30001:27017
    restart: always
    command: mongod --replSet my-mongo-set
  mongo2:
    hostname: mongo2
    image: mongo
    expose:
      - 27017
    ports:
      - 30002:27017
    restart: always
    command: mongod --replSet my-mongo-set
  mongo3:
    hostname: mongo3
    image: mongo
    expose:
      - 27017
    ports:
      - 30003:27017
    restart: always
    command: mongod --replSet my-mongo-set

# finally, we can define the initialization server
# this runs the `rs.initiate` command to intialize
# the replica set and connect the three servers to each other
  mongoinit:
    image: mongo
    # this container will exit after executing the command
    restart: "no"
    depends_on:
      - mongo1
      - mongo2
      - mongo3
    command: >
      mongo --host mongo1:27017 --eval
      '
      db = (new Mongo("localhost:27017")).getDB("test");
      config = {
      "_id" : "my-mongo-set",
      "members" : [
        {
          "_id" : 0,
          "host" : "mongo1:27017"
        },
        {
          "_id" : 1,
          "host" : "mongo2:27017"
        },
        {
          "_id" : 2,
          "host" : "mongo3:27017"
        }
      ]
      };
      rs.initiate(config);
      '
To start this assembly, you can run:
docker compose upAfter the containers finish setting up, you should see some “Connection Accepted” messages that look like this:
mongo1_1     | {"t":{"$date":"2022-05-12T10:42:15.604+00:00"},"s":"I",  "c":"NETWORK",  "id":22943,   "ctx":"listener","msg":"Connection accepted","attr":{"remote":"172.19.0.3:37384","uuid":"53c10057-50bb-4055-8e1c-b3709b168b09","connectionId":19,"connectionCount":13}}
mongo2_1     | {"t":{"$date":"2022-05-12T10:42:15.605+00:00"},"s":"I",  "c":"NETWORK",  "id":22943,   "ctx":"listener","msg":"Connection accepted","attr":{"remote":"172.19.0.2:45566","uuid":"20c69c7a-384c-4d3f-bf47-210030d8151f","connectionId":21,"connectionCount":6}}
mongo3_1     | {"t":{"$date":"2022-05-12T10:42:15.607+00:00"},"s":"I",  "c":"NETWORK",  "id":22943,   "ctx":"listener","msg":"Connection accepted","attr":{"remote":"172.19.0.3:47582","uuid":"bcc4f252-3471-43b1-9834-7f13a369caa7","connectionId":23,"connectionCount":6}}
After this, you can list the active containers by running:
docker ps

CONTAINER ID   IMAGE          COMMAND                  CREATED              STATUS              PORTS                                           NAMES
60fea8228806   1b7803cb64be   "docker-entrypoint.s…"   About a minute ago   Up About a minute   0.0.0.0:30001->27017/tcp, :::30001->27017/tcp   example_mongo1_1
9bfce9c09fc7   1b7803cb64be   "docker-entrypoint.s…"   About a minute ago   Up About a minute   0.0.0.0:30002->27017/tcp, :::30002->27017/tcp   example_mongo2_1
bbc6c97094b6   1b7803cb64be   "docker-entrypoint.s…"   About a minute ago   Up About a minute   0.0.0.0:30003->27017/tcp, :::30003->27017/tcp   example_mongo3_1
The container names may change based on your current directory name. You can choose any of the mongo containers and run the mongo shell by executing:
docker exec -it example_mongo1_1 mongoReplace
example_mongo1_1with your container name
Going Forward
Using Docker, we were able to get a Mongo replica set up and running in ~5 minutes.
Although this set up is great to experiment with replica sets, there are some precautions to be taken before moving it to production :
- None of the databases have any administrative security measures. Be sure to add users and passwords when deploying this solution on production servers.
- The different replica containers should be kept on different physical servers. Run at least one container on a different server and access it through its external IP address and port (in our case the external facing ports for out containers were
30001,30002, and30003formongo1,mongo2, andmongo3respectively). - If we remove one of our containers by mistake, the data would also vanish. Using Docker volumes and setting the appropriate
--dbpathwhen runningmongodwould prevent this from happening.
Finally, instead of running a bunch of shell scripts, you may find it more convenient to automate this whole process by using multi-container automation tools like docker-compose.
If you liked this post, you may also like my other post on using the BusyBox Docker image